Documentation
A complete guide to every screen, feature, and button in Where The Bleep. Use the table of contents to jump to any section.
Startup Wizard
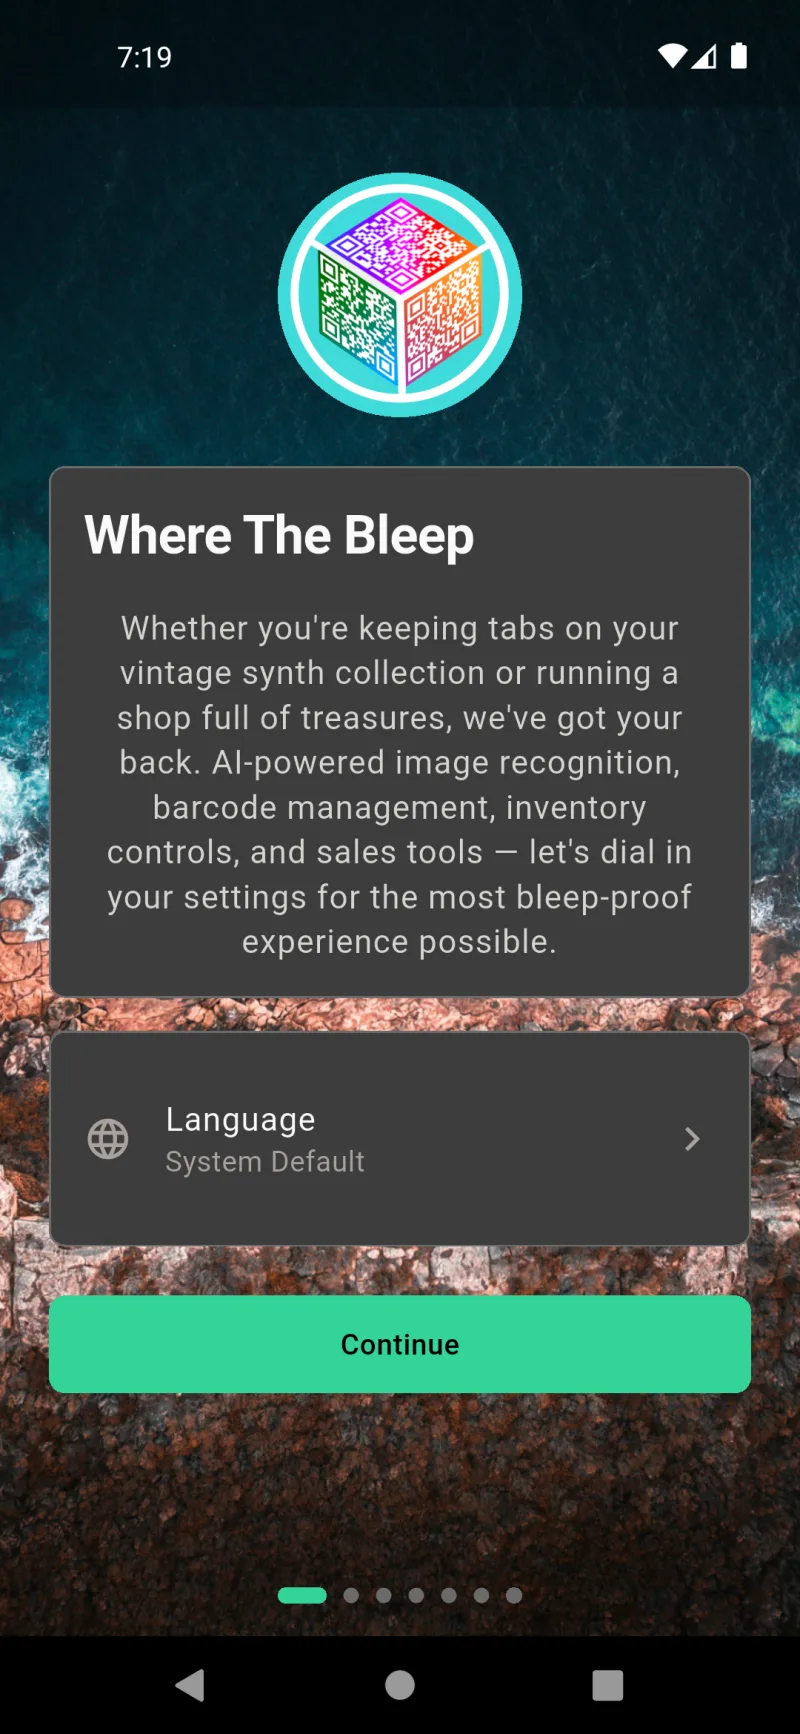
Welcome to Where The Bleep
First launch greets you with a quick intro and a language tile. The app starts in your phone's system language by default — tap the Language tile to switch it to anything you like. When you're ready, tap Continue to start a quick five-minute setup that tunes the app to how you actually plan to use it.
Pick Your Language
Tapping the Language tile opens a full list of every language the app speaks, alphabetized in their native names. Choose one and the app reloads in that language right away. Don't worry about getting it perfect — it can be changed later under Settings → Language.
What Brings You Here?
The wizard asks what you're using the app for so it can hide features you don't need. There's no wrong answer, and the Next button stays grayed out until you pick something — that's just to make sure you don't blow past this important choice.
Three Profiles to Choose From
Personal Keeper is for tracking your stuff at home. Inventory Pro layers on barcode scanning, stock counts, and reorder alerts for shop owners. The Full Bleep adds sales, payments, and point-of-sale — the whole enchilada. Tap one to highlight it and unlock Next. Every feature can be toggled on or off later in Settings → Features, so this is a starting point, not a commitment.
AI Superpowers
These are optional features that use AI to save you typing. Both default to off — you choose whether to opt in. They need an API key to actually work, and the wizard reminds you where to add that key on the final screen.
Image Recognition & Sales Descriptions
Image Recognition lets you snap a photo of an item and have AI suggest a name and fill in details — like having a tiny librarian in your pocket. Sales Descriptions writes catchy listing copy when you put something up for sale. Toggle either on by tapping its card; the green border and checkmark confirm it's enabled.
Make It Yours
Where The Bleep paints content over a customizable background image. The default panel opacity is 100% — fully solid panels for maximum readability. The slider below lets you preview see-through panels: drag it and watch this very screen change in real time.
Panel Opacity Preview
Slide left for a more transparent look — your background photo and Bleep mascot show through the panels. Slide right for solid, no-distractions panels. The change applies live across the whole app. Background image and mascot can be swapped anytime under Settings → Appearance.
Lock It Down?
Where The Bleep can encrypt all your inventory data end-to-end before it ever leaves your device. With encryption on, only you can read your data — even we can't peek. Toggle Enable Encryption to opt in now. If you skip it, you can always turn encryption on later under Settings → Security.
Offline-First by Design
Where The Bleep is offline-first — your data lives right on this device. No internet required to add items, scan QR codes, or run your business; everything works in airplane mode. Sync to other devices is optional and only needed if you want your inventory available on more than one phone or tablet.
Multi-Device Sync
Tap Want to sync across multiple devices? to expand the details. With a Where The Bleep subscription your inventory stays in sync across every device in real time — add an item on your phone, see it on your tablet a moment later. Sync also enables multi-user logins so a sales team can share one inventory. Subscription details live under Settings → Subscription.
You're All Set!
The final wizard screen summarizes the next steps based on the choices you made. Each card is a quick-link reminder — like 'add your AI key in Settings → AI Settings → API Settings' or 'pair your Square reader under Settings → Features → Square Settings'. Skim it, then tap Let's Go to land on the Home dashboard.
Your Personalized Punch List
Scroll the summary card to see every recommendation. Cards only appear when they apply — for example, the AI key reminder shows up only if you opted into AI features. Fine-Tune Your Features at the bottom is the reminder that any feature can be toggled later in Settings → Features without redoing the wizard.
Set Up Encryption
If you opted into encryption, tapping Let's Go drops you straight into the encryption setup flow before the home screen. You'll create a strong password that becomes the only key to your data — encrypted on this device before it ever syncs to the cloud, so only you can decrypt it.
Create Your Password
Enter a password and confirm it. The strength bar fills as you add length, mixed case, numbers, and special characters. Strong is the goal — that means the password satisfies every requirement listed below. Type the same password in both fields; the green outline on the confirm field indicates a match.
Password Requirements
Each of the five requirements turns green as you meet it: at least 12 characters, lowercase letter, uppercase letter, number, and special character. The orange warning at the bottom is the one to take seriously — if you forget your password and lose your recovery phrase, your data is gone for good. Tap Continue when every requirement is checked.
Save Your Recovery Phrase
The next screen shows a 24-word recovery phrase — your only backup if you forget your password. Tap the eye icon to reveal it, then print it or save it as a PDF and store it somewhere safe (a fireproof box, a password manager, anywhere that isn't this phone). The Complete Setup button stays disabled until you save and confirm.
Saving the PDF
Tapping Save as PDF opens your phone's file picker. The recovery phrase exports as where_the_bleep_recovery_phrase.pdf. Save it somewhere you'll remember — and somewhere private. Treat this file like cash: anyone who has it can decrypt your data.
Confirm You Saved It
Once you've printed or saved the phrase, scroll down to the confirmation checkbox. Tick it to acknowledge that without this phrase, your data cannot be recovered if you forget your password. We won't be able to help — and that's the whole point of end-to-end encryption.
Complete Setup
With the box ticked, Complete Setup lights up green. Tap it to finish the encryption flow and head to the home screen. Your data is now encrypted at rest on this device and any time it syncs to the cloud — only your password (or recovery phrase) can unlock it.
You're In
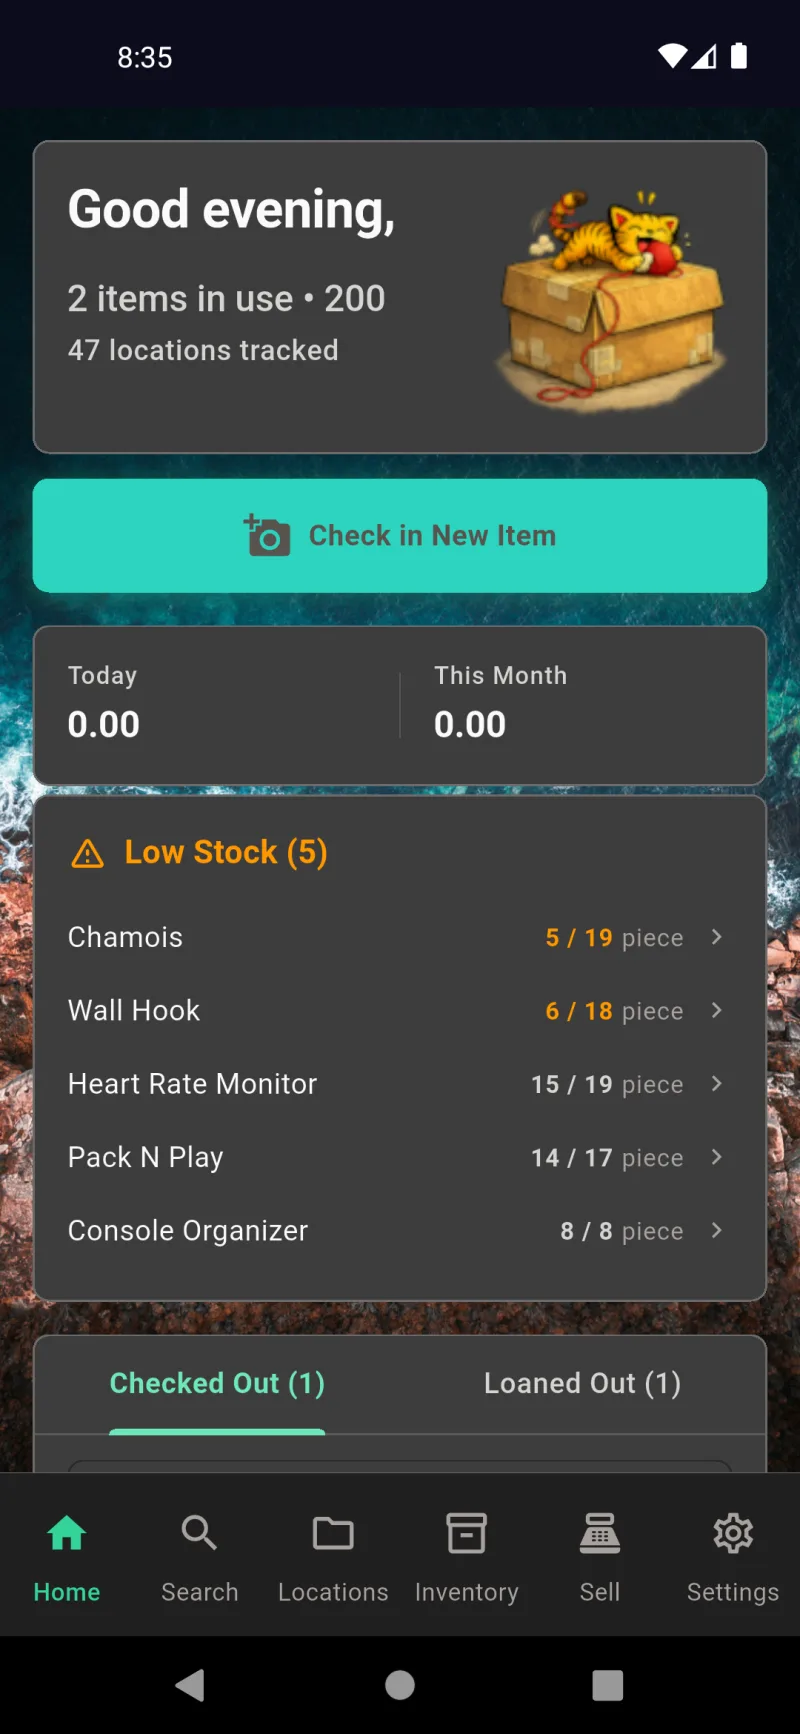
Setup is done. The Home dashboard greets you with a quick stats summary, a big Check in New Item button to start adding things, and a checked-out / loaned-out tab so you can see what's not in its usual spot. The bottom navigation bar takes you to Search, Locations, Inventory, Sell, and Settings — visible features depend on the profile you picked at the start of the wizard.
Home Dashboard
Home — Your Daily Snapshot
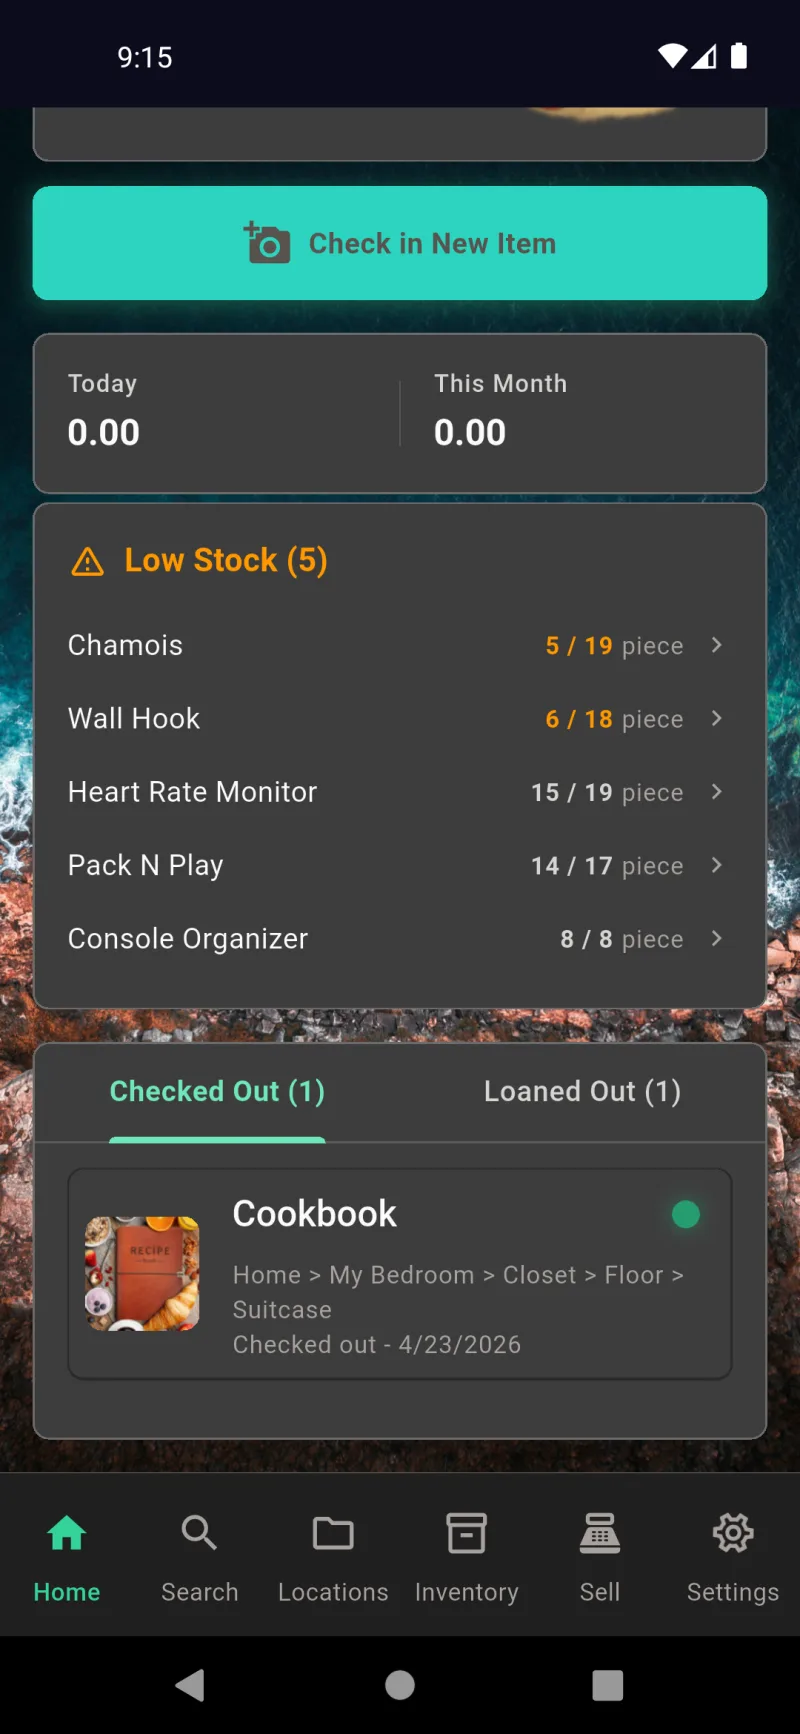
The home tab is your daily snapshot. A time-of-day greeting and mascot sit on top, with quick stats: how many items are checked out, how many you've tracked total, and how many storage locations exist. Below the big Check in New Item button, today's and this month's net sales totals appear when sales are on. The orange Low Stock card lists items that have dropped to or below their reorder point so you can restock before you run out. Tap any row to jump straight to that item.
Checked Out & Loaned Out
Scroll down and you'll find two tabs: Checked Out and Loaned Out. Checked Out tracks things you've taken with you — a cookbook in a suitcase, tools in the truck — with the full location breadcrumb and the date you grabbed it. Loaned Out tracks things you've handed to other people. Tap any row to open the item and either Return / Move it back to storage or update where it lives now. This is the fastest way to remember what's not where it should be.
Search — Find Anything Fast
The Search tab is the alphabetical index of every item you own. Each row shows a thumbnail, the full location breadcrumb (Home › Kitchen › Pantry › Bottom Shelf), and the current status. Type to filter, or tap the mic to search by voice. Use the sort and filter buttons in the header to narrow by status, and the QR icon to scan a label and jump straight to the matching item. This is where you go when you remember the item but not where you put it.
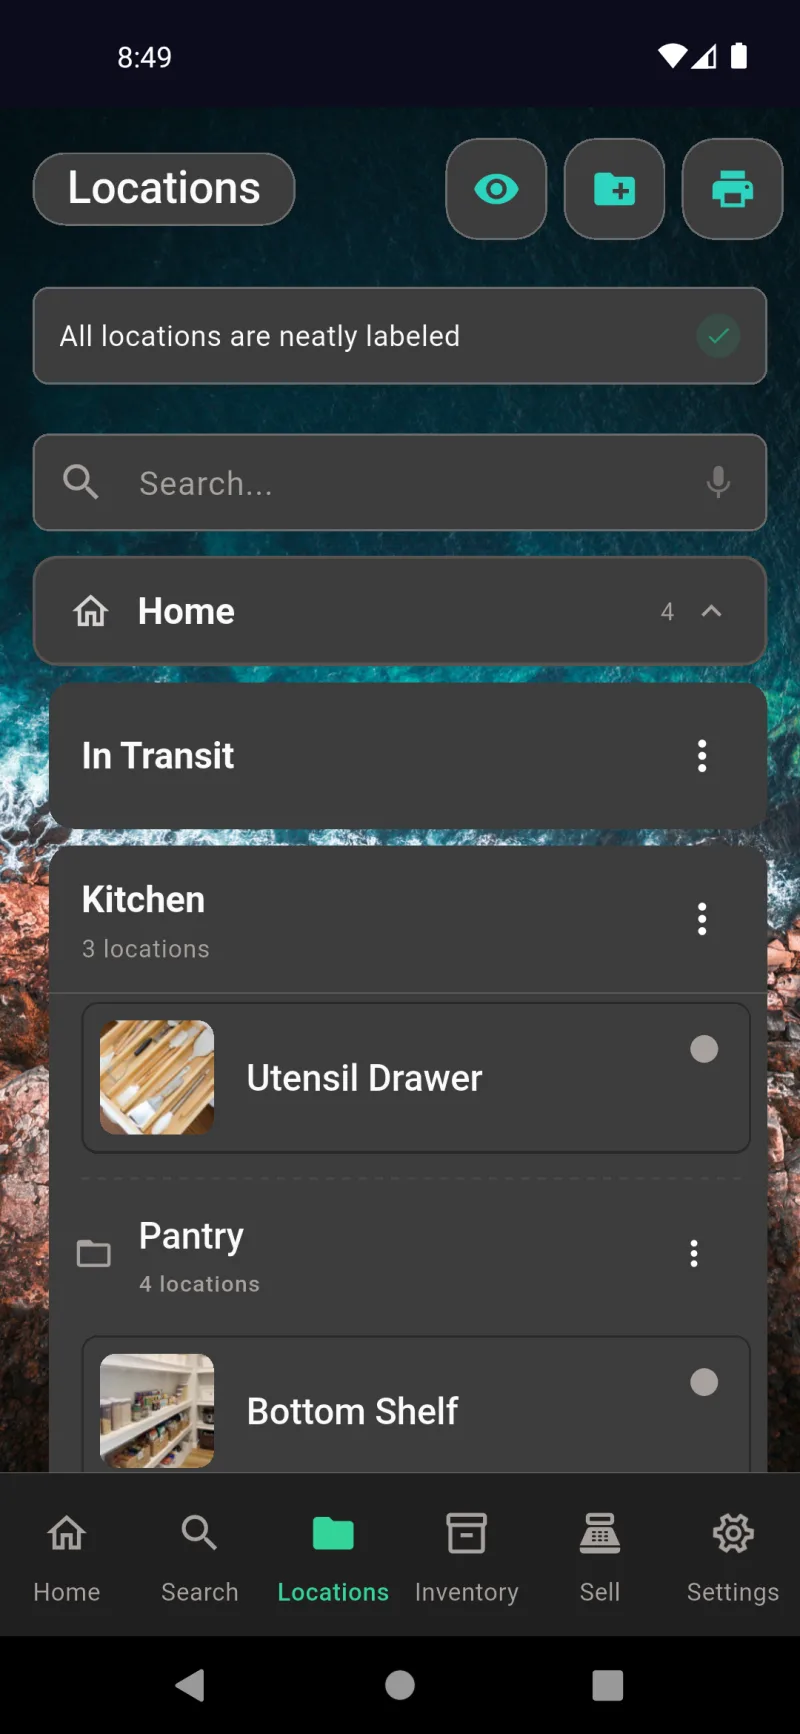
Locations — Your Storage Map
The Locations tab is the map of where everything lives — Home, Garage, Office, and every shelf, drawer, and bin inside them. Expand a parent to see its children, or use the search bar (with voice support) to jump to a specific spot. The eye icon toggles unprinted-label highlighting, the folder-plus adds a new location, and the printer prints labels in bulk. Each row's three-dot menu lets you add a sub-location, edit, move, or delete. The In Transit bucket is reserved for items mid-move.
Inventory — Track Quantities
The Inventory tab is for the stuff you keep multiples of — supplies, stock, parts. The header shows tracked items, total units across all locations, and how many are running low. Tabs filter to All, Low Stock, or Out of Stock. The floating QR button opens the inventory scanner so you can receive new stock or count what's on the shelf without typing. Inventory only appears when it's enabled under Settings → Features → Enable Inventory.
Sell — POS Register
The Sell tab has two sub-tabs at the top: POS and Online. POS is your in-person register — today's sales, returns, and net totals up top, recent transactions just below, and a green QR button that opens the scanner to add items to a cart. From there you check out with card reader, manual card, cash, or external payment. Sell only appears when sales are enabled under Settings → Features → Enable Sales.
Sell — Online Listings
Switch to the Online sub-tab to manage marketplace listings. The yellow List an item for sale button starts a guided flow that picks an item from your inventory, asks which marketplace (eBay, Facebook Marketplace, Nextdoor, and more), and walks you through pricing, condition, and category. Active, draft, and historical listings each get their own sub-tab so a sold item is one tap away from being marked moved or refunded. Turn this view on under Settings → Features → Enable Online Sales.
Settings — Everything Else
Settings is where everything lives. Sections collapse by default so the screen stays scannable: General for theme, language, and people; Features for inventory, sales, AI, and print options; Sales for business info, Square, email, eBay, and salespeople; System for sync, backup, and export; Security for encryption, 2FA, and certificates; Account for password and sign-out; and Subscription for trial status and plans. Restricted operators only see a trimmed-down version of this menu.
Item Management
Finding Items From Home
Every item lives one tap away from the Home dashboard. The Low Stock card surfaces tracked items below their threshold, and the Checked Out tab shows what's currently out — here, the Cookbook with its full location breadcrumb and checkout date. Tap any row to jump straight to that item's detail screen. The same dashboard handles loaned items in a sibling Loaned Out tab.
Item Detail Screen
The item detail screen leads with a hero photo (tap the trash to delete or the refresh arrow to retake) and two big actions: Check out moves the item out of storage to track that it's in use, and Sell opens Add to Cart. Below the actions you'll find Images for additional photos and an Info button that opens the full Item Details panels. Everything you need to act on the item is reachable without scrolling.
Location, Status, And Loan
Scroll down and you'll see the item's Location with a photo and breadcrumb (Home → Kitchen → Pantry → Middle Shelf), its current Status, and its Description. The orange Loan out button is for lending items to people — separate from Check out, which just records that you're using it yourself. Loans capture who has it and when it's due back; check-outs don't.
webDocsItemManagementSlide4Title
webDocsItemManagementSlide4Body
Pick A Recipient
Tapping Loan out opens the contact search. Start typing and the list filters live — here "Sa" pulls up the existing Sarah Johnson contact. If the person isn't in your address book yet, tap Create "Sa" to add them on the fly with just a name. You can flesh out their phone, email, and address later from Settings → General → People.
Expected Return Date
After choosing a recipient, pick an Expected return date. The picker defaults to one week out so you can usually just confirm — drag back to today for short loans or forward for long ones. The home dashboard uses this date to flag overdue loans, and the recipient gets credit for returning it on time when you tap Return / Move later.
Item On Loan
While an item is loaned out, the orange Loan out button is replaced by a green Return / Move button. One tap kicks off the return flow — pick the storage location to put it back into and the loan closes out automatically. The hero photo and Images section still work normally so you can update the item's photo or notes mid-loan if anything changes.
Scan Location To Return
Return / Move opens the Scan Location screen. Point the camera at the QR label on any storage location to drop the item there instantly, or tap Browse for storage location to pick from your location tree. The bottom shortcut Return to last location is the fast path when you're putting things back exactly where they came from — one tap and you're done.
webDocsItemManagementSlide9Title
webDocsItemManagementSlide9Body
Back In Storage
Once an item is back from a loan, the detail screen swaps the orange action for Check out and Sell again — the same starting point as any other in-storage item. From here you can tap the photo to swap or rotate it, jump into Info for the full Item Details panels, or kick off another loan. Status, location, and description are visible at a glance so you know what state the item is in before you act.
Add To Cart
Tap Sell on any item and the Add to Cart sheet opens with the item already loaded. The Quantity stepper is bounded by what's actually in stock — "1 available" here — and the Unit Price field is editable so you can override your saved price for one-off discounts. The subtotal updates live. Tap Add to Cart to drop it into the active POS session, where you'll finish checkout from the Sell tab.
Item Details Menu
Tap the Info button on any item to open the Item Details menu. Five collapsed cards organize every optional field: Main Info, Insurance & Claims, Lifecycle & Service, Legal & Tax, and Sentimental. None of this is required to use the app — fill in only the sections that matter for your use case (insurance claims, business depreciation, heirloom tracking, etc.). The red Remove from inventory button at the bottom is the destructive escape hatch.
Main Info
Main Info holds the everyday fields: name, description, category, and barcode. The Track Inventory toggle promotes the item from a one-of-a-kind possession to a tracked SKU with quantities, low-stock thresholds, and stocktake history. Tap Edit Info to switch the card into edit mode — voice input is available on text fields, and barcodes can be scanned with the camera instead of typed.
Insurance And Claims
Insurance & Claims captures everything an adjuster will ask for after a loss: Brand, Model, Serial Number, Purchase Date, Purchase Price, Current Value, Replacement Cost, and an Insurance Rider Ref. The Documents section attaches receipts, appraisals, and warranty PDFs directly to the item. Export this as a PDF insurance report from Settings → System → Export My Data when you need to file a claim.
Lifecycle And Service
Lifecycle & Service tracks how an item ages. Log Condition, Last Maintenance, and a Maintenance Interval in days so you know when to service it next. Expected Lifespan and End of Life Date help with planning replacements. Warranty & Service stores expiration dates and RMA numbers, and Depreciation & Appreciation picks a model for items that change value over time — useful for both insurance and tax purposes.
Legal, Tax, And Sentimental
Legal & Tax flags items as a Business Asset or Depreciable Asset, with fields for Donation Value and Country of Origin. Sentimental covers the human side: a Sentimental Value note, whether the item was Gifted (and by whom), the Occasion, free-form Personal Notes, and an Heirloom flag. Skip everything you don't need — these cards stay collapsed and out of the way until you tap Edit Info.
Locations
Your Storage Hierarchy
The Locations tab is where your hierarchy lives — homes, rooms, and the specific drawers and shelves inside them. Containers like Kitchen and Pantry group sub-locations and show a count; destination locations like Utensil Drawer and Bottom Shelf hold the actual items. Tap any row to drill in. The status banner at the top confirms when every QR label has been printed, and the bottom-nav Locations icon brings you back here from anywhere in the app.
Visualize the Whole Tree
Tap the eye icon in the top bar to open the Location Report — an interactive sunburst that maps every container and destination in a single glance. Each ring is a level of the hierarchy, and each wedge is sized by how many items live there. Tap a wedge to see the breadcrumb and item count for that location. The two summary tiles below show Total Items and Total Locations so you know the scale of what you're tracking.
Per-Row Quick Actions
Every container and destination has a three-dot menu with the same actions: Add storage location drops a new child inside it, Edit opens the name, photo, and parent for tweaking, and Delete removes it. Deleting a container also checks out every item it holds so nothing goes missing — you'll always know where your stuff used to live. Adding from the menu pre-selects the parent so you don't have to pick it again.
Build Multi-Level Locations
Tapping the folder-plus icon in the app bar opens the Create Storage Location builder. Pick a Base Location — Home, Office, Garage, or Back Shed — then add or pick a name for each level. The breadcrumb at the top updates live so you can see exactly where the new spot will land. Tap Create new level to go deeper, or hit Create destination for level N when you've reached the leaf where items will actually be stored.
Name and Photograph the Spot
After confirming the path, the builder asks for the destination's Name, an optional Description, and a Location photo so you can recognize the spot at a glance. Both text fields support voice input via the mic icon. The photo step is optional but worth doing for cluttered drawers — a thumbnail in the list beats squinting at \Drawer 3\" later. Hit Create Location when you're done; the app generates a QR code and queues it for printing."
Print Just What You Need
The print icon in the app bar opens a two-option menu. Print unprinted labels only sends QRs that have never been printed — useful when you've added a few new locations and don't want to waste a fresh sheet of label paper. Print all labels regenerates the full set, which is what you want after redesigning your label format or when relabeling everything from scratch. Both options open the print preview where you can pick the Avery template and tweak margins.
Edit Photos, Names, and Parents
Tapping Edit on any destination opens this sheet. Replace the Location photo with the circular refresh button, rename it, add a Description, or move it to a different Parent container via the dropdown. Changes auto-save as you type when you're editing an existing location, so there's no separate Save button — just back out when you're done. The dropdown lists every container so you can reorganize without dragging anything.
ID Codes, Reprints, and Deletes
webDocsLocationsSlide8Body
Sub-Locations and Reorganizing
Sub-locations like Floor Storage and Under Sink live below their parent container and get the same three-dot menu — plus a Move action so you can re-parent a whole sub-tree without recreating it. Move is handy when you reorganize a room or split one shelf into two. Tap the row itself to expand and see what's inside; tap the dot on the right to switch which destination is active for quick check-ins.
Search Across Every Shelf
webDocsLocationsSlide10Body
QR Codes & Labels
Why Print Codes At All
Item barcodes earn their keep at sell time. Once a product has a UPC or EAN on file, the eBay listing form on the Sell tab pre-fills the bits buyers expect — and you only need to confirm Shipping, Return Policy, Payment Policy, Listing Format, Quantity, and your ZIP / Postal Code before tapping Create Listing. The same barcode you printed onto the inventory label travels with the item all the way to the marketplace, which is why the print-options screens that follow matter.
Print Unprinted vs Print All
Open the Locations tab, tap the printer icon in the top bar, and you get two choices. Print unprinted labels only generates QRs for spots you haven't labeled yet — perfect when you add a new shelf or drawer and don't want to reprint the whole house. Print all labels regenerates the full set, which is what you want the first time around or if you've redesigned your label format. Both routes drop you into the same Print Options screen so the layout choices stay consistent.
webDocsQrCodesSlide3Title
The Print Options screen is the central control panel for every label you generate. Label Format picks the Avery template, Print Vertical rotates the QR above the text for narrow shelves, and the Destination and ID Code dropdowns scale each text element independently. Show Breadcrumb adds the full location path under the name so you can tell two "Shelf A1" labels apart, and Top Margin nudges the print start in inches so partially-used label sheets line up.
Pick Your Avery Template
Tap the Label Format dropdown and you get two pre-cut sheet sizes: 1 x 2-5/8 inch labels (Avery 5160, 30 per sheet) for the everyday case, and 2 x 4 inch labels (Avery 5163, 10 per sheet) when you want the QR and text big enough to read across the room. Both are standard at any office-supply store. Switching here resizes the on-screen preview immediately so you can tell which sheet to grab before you commit ink.
Live Label Preview
Scroll down to the Preview card and you'll see exactly how a single label is going to print — at the right scale and proportions for the format you picked. The default horizontal layout puts the QR on the left, then the destination name ("Desk"), the ID code in bold ("A1"), and the breadcrumb path ("Home > Office > Desk") stacked on the right. Adjust any setting above and the preview redraws — no need to burn a sheet to find out how things will look.
Vertical Layout for Spines
Flip Print Vertical on and the preview rotates: QR on top, text rotated underneath. This is the layout to pick when you're labeling the spines of binders, the edges of shelves, or anything narrower than it is tall. The preview keeps the same content — destination, ID code, and breadcrumb — just stacked vertically so they read top-to-bottom on a sideways label.
Resize or Hide Each Field
The Destination and ID Code dropdowns each accept Hidden, 1X, 2X, or 3X sizes — so you can downplay one field and shout the other. Cranking ID Code to 3X with Show Breadcrumb off gives you a chunky room-readable code ("A1") next to the QR — ideal for warehouse-style storage where you want to see the slot from across the garage. Hide either field entirely if your labels feel too busy.
webDocsQrCodesSlide8Title
Item barcodes use a separate dialog. From the Inventory tab, tap the printer icon to open Print barcode labels. Pick Avery 5160 or the larger 2 x 4", nudge the Top Margin for a half-used sheet, and decide whether to Include barcode number under each code (handy when scanners flake out and you need to type the digits). Flip Only pending reprints on to skip codes you've already printed — saves sheets when you've added a few new items to a stocked shelf.
Save as PDF or Print
Tap Print and the system print sheet takes over — Save as PDF is the most common pick when you want to email the file, archive it, or send it to a printer that isn't reachable from your phone. The preview shows every label tiled at its real position on the chosen paper size (here, ISO A4) so you can spot a missing column or a misaligned margin before sending it off. From here you can swap printers, change copies, or save the PDF straight to Files.
Search & Voice
Search Tab Overview
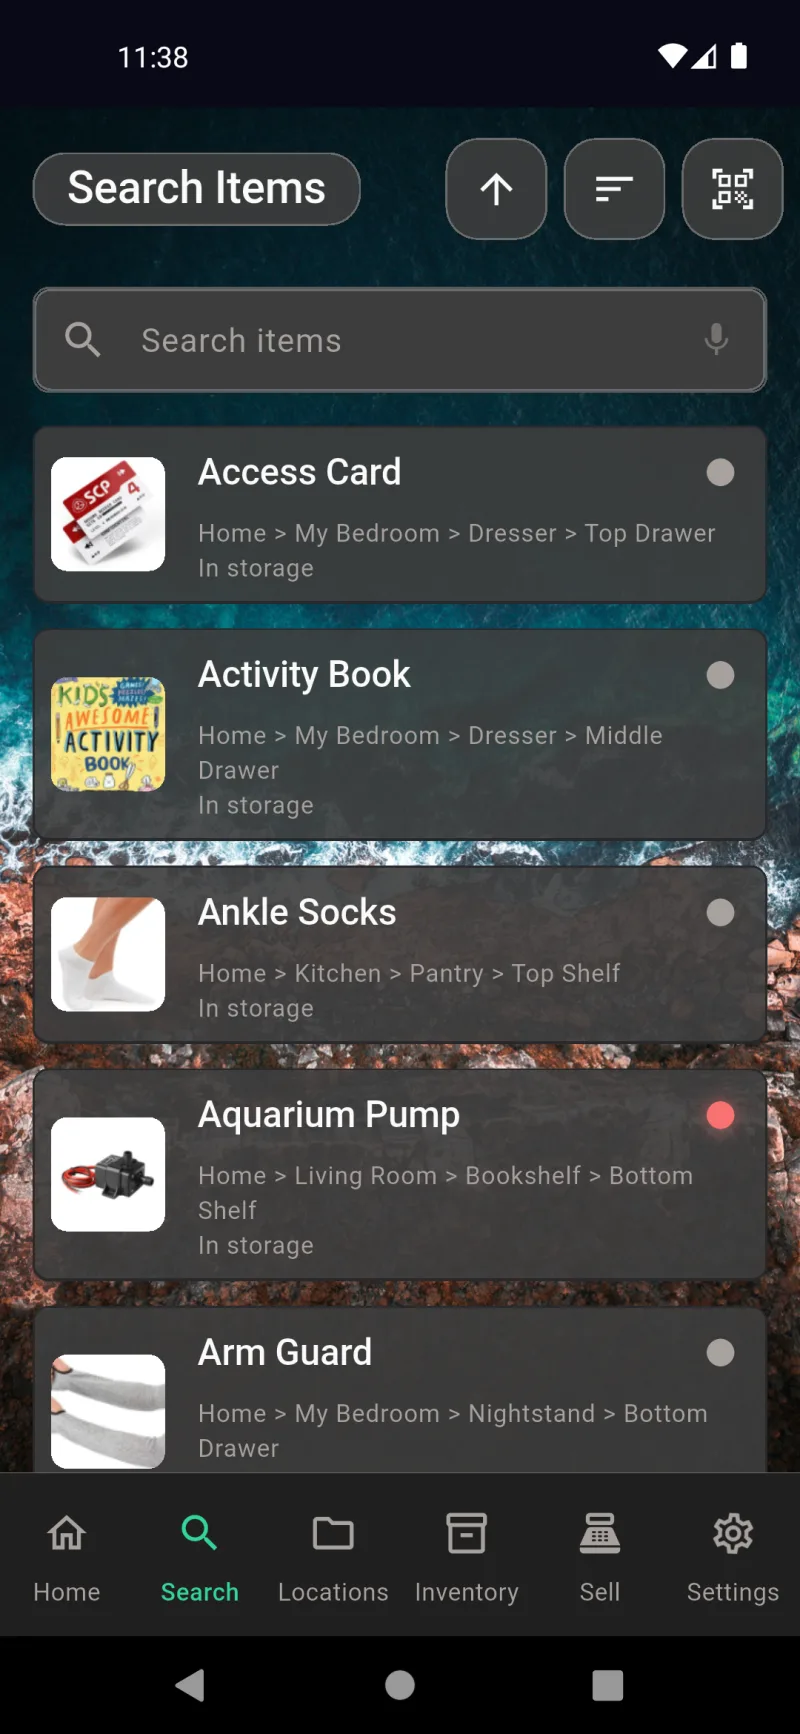
The Search tab opens to every item you own, sorted alphabetically with a location breadcrumb under each name. Tap the search field to filter by name, description, or hashtag — results update as you type, powered by SQLite FTS5. Use the sort button (the lines icon) to switch between alphabetical, recently created, last updated, price, inventory, or last checked out. The QR icon on the right scans a location code so the list narrows to one room or drawer.
Microphone Permission
The first time you tap a microphone anywhere in the app, Android asks for permission to record audio. Pick While using the app for the smoothest experience, or Only this time if you'd rather decide each session. Speech recognition runs through your phone's built-in dictation engine — no audio leaves the device — so this prompt is the OS asking, not Where The Bleep. If you tap Deny, voice input is disabled until you re-enable the mic in Android settings.
Voice on Check In
Every text field in the app gets the same mic icon — including the Check In form's Name and Description fields. Long-press the mic and start talking; the icon pulses green while it's listening and the words appear at the cursor as you speak. Release to stop. The keyboard's own dictation key works too, so you can pick whichever feels more natural. Voice input is great for noting down a description while your hands are full with the item.
Browse Every Item
Each result row shows a thumbnail, the item name, the full location breadcrumb (Home > Kitchen > Pantry > Top Shelf), and the current status. The colored dot on the right indicates state — gray for in storage, red for checked out, and so on — so you can scan a long list at a glance. Tap any row to open the item's detail screen. With no query typed, this view doubles as a complete inventory list you can sort however you want.
Search Locations by Voice
webDocsSearchSlide5Body
Voice in Item Editing
webDocsSearchSlide6Body
Voice in Inventory Search
The Inventory tab uses the same voice-enabled search field above the All / Low Stock / Out of Stock tabs. Say a product name to jump to it without scrolling past dozens of tracked items. The cards show current quantity and an Out of Stock chip when the count hits zero, so combined with voice search this is the fastest way to check whether you actually need to reorder something before heading to the store.
Voice for Listings
Marketplace listing forms use voice too. On Review Details for an eBay or Marketplace listing, you can dictate the Asking price, Seller notes, and Quantity instead of typing. This is especially handy for long seller notes describing condition or accessories — talk through the item once and the text lands ready to publish. The mic works on every text field in this flow, including shipping ZIP and reserve price.
People & Loaning
Where to Find People
The People list lives under Settings → General → People with the subtitle Manage checkout recipients. This is where you build a roster of friends, family, coworkers, or neighbors who borrow your stuff. You don't have to seed it ahead of time — every loan flow lets you add a name on the fly — but pre-loading common borrowers makes lending feel like a single tap. The list is searchable, sorted alphabetically, and lives entirely on-device until your encrypted sync pushes it to your other devices.
Browse Your Contacts
The People screen lists every contact alphabetically with a search field at the top and a green add-person floating button at the bottom right. Tap a name to edit their details, or use the floating button to open the full Add person form. Notes you write on a contact appear underneath their name in the list, so you can leave reminders like tends to keep books too long visible at a glance.
Quick Create from Search
Type any name into the search field and the list filters in real time. If nothing matches, a Create \Jane\" row appears at the top — tap it to instantly create a contact with just that name and no other fields. This is the fastest path when you remember someone's first name mid-loan and don't want to leave the flow to fill out a full form. You can always come back later and add their phone or email."
Avoid Duplicate Contacts
When your search partially matches an existing name, both options appear together — the Create shortcut for a brand-new person and the matching contact below it. This prevents accidental duplicates: if you typed jan and Jane already exists, you'll see her name right there before you create a second contact. Tap the existing person to use them, or tap Create only when this really is someone new.
Edit Contact Details
The full Edit person form captures Name, Phone, Email, Address, Relationship, and Notes. Only Name is required — every other field is optional and saves automatically as you type, with a half-second debounce so you don't see a save indicator on every keystroke. Every text field has a microphone icon for voice input, which is handy for dictating an address. Use the Delete button at the bottom to remove a contact; their loan history stays attached to the items themselves.
Check Out vs Sell
Lending starts from any item's detail screen. Items in storage show two action buttons: a green Check out for quick personal use (no person attached) and a yellow Sell for marking it sold. Check out simply removes the item from its location and parks it in your Checked Out tab — perfect for taking something out of storage when you don't need to track who has it.
Loan Out Button
Scroll the item detail down past the photo and location and you'll find the orange Loan out button. Use this when you're handing the item to someone else — unlike Check out, it asks for a person and an expected return date so you have a record of who borrowed what. Loan-out is the right choice for books, tools, and anything else you actually expect to come back.
Pick the Borrower
webDocsPeopleCheckoutSlide8Body
Set Expected Return Date
After picking a person you get a calendar prefilled to one week from today. Tap any future date to set the Expected return date, then tap OK. The date is purely informational — the app doesn't auto-recall items — but it powers the return-by date you'll see on the Home dashboard so you can spot anything that's overdue at a glance. Range is from today out to five years.
Loaned-Out Tab on Home
Once an item is loaned out, it shows up under the Loaned Out tab on your Home dashboard alongside the Checked Out tab. Each row shows the borrower's name, the date it left, and the expected return date so you can see at a glance who has what. Tap any row to jump to the item's detail screen, where the Loan out button has been replaced by Return / Move — one tap puts the item back into storage and updates the borrower's history.
Inventory Tracking
Inventory Tab Overview
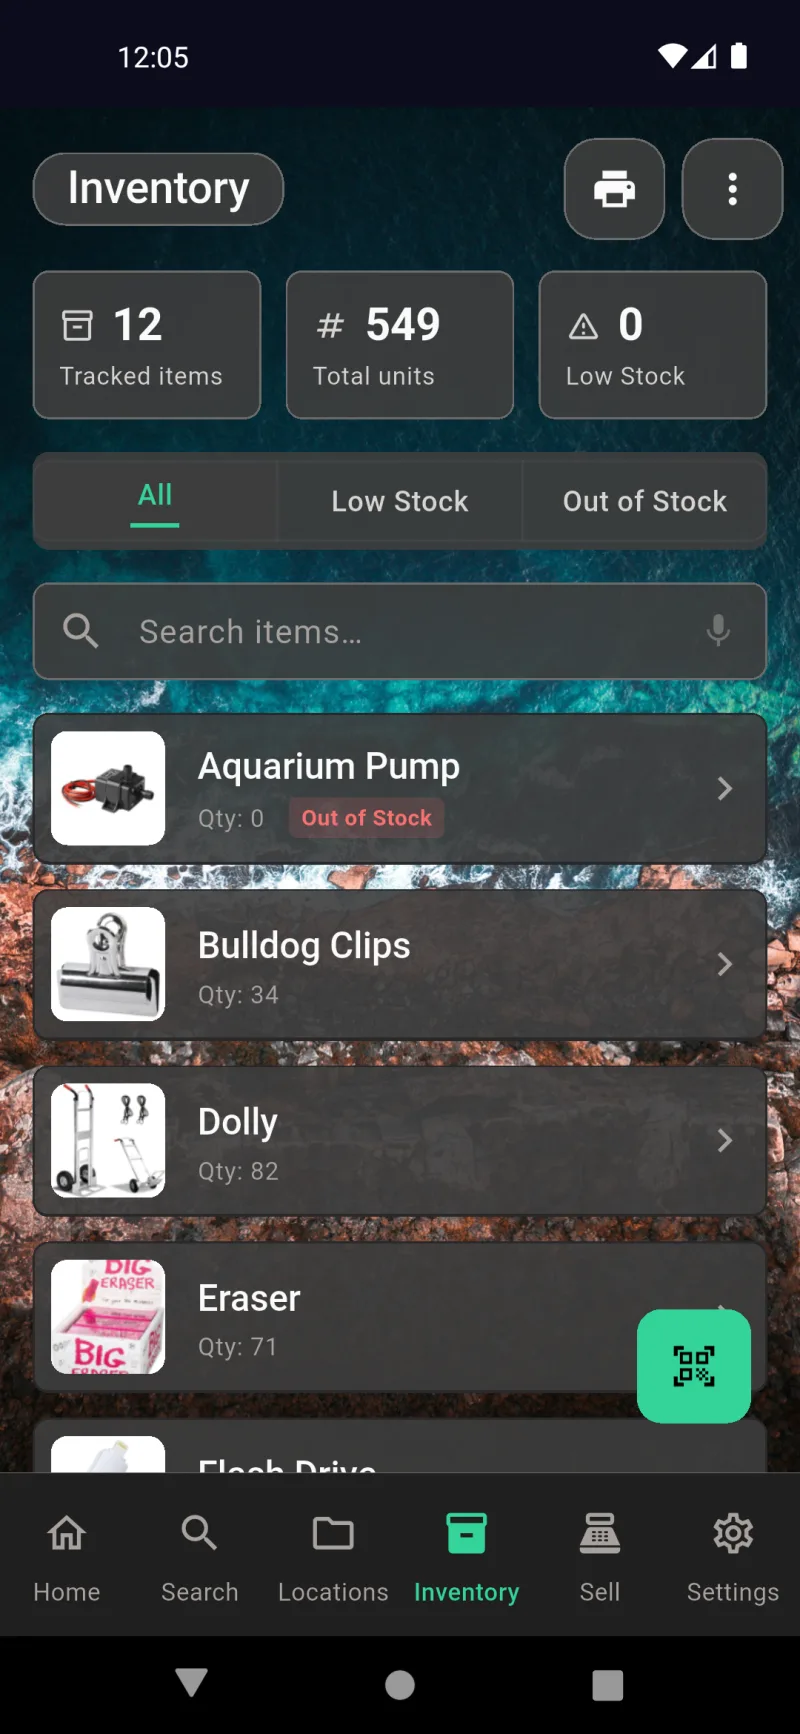
The Inventory tab is your home base for stock-tracked items. Three summary cards across the top show Tracked items, Total units, and Low Stock at a glance. Below that, filter chips for All, Low Stock, and Out of Stock narrow the list, and a voice-enabled search bar lets you jump straight to a specific item. Each row shows the thumbnail, name, and current quantity with a colored badge if anything's running low. The floating green button opens the barcode scanner.
Edit Item Inventory
Tap any tracked item to land on its detail screen with a dedicated Inventory card. The + and - buttons step the count by one and every tap is logged; tap the number itself to type an exact quantity. Move items transfers stock to another location and Split across locations divides it between several. The big Check out and Sell buttons jump straight into the lending or POS flows, and the small page icon at the top right opens the inventory PDF report.
Per-Item Inventory PDF
The page-icon shortcut opens a per-item Inventory Report as a print-ready PDF. The header carries the item thumbnail, name, and current on-hand count; below that, a full ledger of every adjustment — date, action (Stocktake, Sale, Initial Set, etc.), previous quantity, and new quantity. Use the system print dialog to save it as a PDF, send it to a printer, or hand it off to any installed app.
Inventory Action Menu
The ⋮ menu in the top-right is the launchpad for everything beyond simple counting. The top group runs operations — Stocktake, Open transfers, Import from CSV. The middle group generates the three quantitative PDFs — Stock Level Report, Movement Report, Valuation Report. The bottom group surfaces audit data — Discrepancies and Shrinkage report. Each entry walks you through its own flow.
Stocktake — Pick a Location
Stocktake starts by asking which location you're counting. The voice-enabled search filters the list as you type, and every entry shows the full breadcrumb so Top Shelf in the bookshelf doesn't get confused with the Top Drawer in the garage. Tap a location to walk through every tracked item stored there.
Count Items at the Shelf
Each item shows its expected current quantity next to a field where you type what you actually counted. Add a Note if anything looks off — a damaged box, items moved, or a guess on shrinkage. Tap Save to record only the items whose count changed; matching counts skip silently. Each adjustment is logged with timestamp, delta, and reason for the audit trail.
Barcode Scan Modes
The floating QR button opens Inventory Scan with two tabs at the top. Receiving auto-increments the count by one for every barcode you scan — perfect for unpacking a delivery hands-free, with an audible chime on each successful read. Manual opens a quantity prompt for each scan instead, useful when you're correcting a count or recording a specific batch size. A third sales-decrement mode lives on the Sell tab inside the POS scanner.
Import from CSV
Import from CSV bulk-updates inventory from a spreadsheet. Pick a file with two columns — barcode_or_name and quantity — and the app fuzzy-matches each row to an existing item. Numeric values 8–14 digits long are treated as barcodes; everything else searches by name. The first row is detected as a header automatically and every change is logged as a CSV import adjustment so you can trace it back.
Valuation Report
The Valuation Report sums up what your stock is worth right now. Items group by location breadcrumb with quantity, unit value, and line total, plus a subtotal for each location and a grand total at the end. Use it for end-of-period accounting, insurance schedules, or just to see whether the garage or the office holds more inventory. Save as PDF or print directly from the preview.
Movement Report
The Movement Report answers "what changed and by how much?" Pick a date range and the app crunches every inventory log entry in that window into a single net-change figure per item — +70 here, +82 there — sorted with the biggest movers on top. It's the fastest way to see where stock is actually flowing through the system, separate from the static snapshot of current quantities.
Stocktake Discrepancies
The Discrepancies screen lists every stocktake adjustment that came up short or long along with the reason you tagged at the time. Empty here means clean books — every count has matched expectations so far. Once entries pile up, this becomes your audit trail for shrinkage, miscounts, and damage events, with the option to drill into any single record.
Shrinkage Report PDF
The Shrinkage report takes those tagged discrepancies — Damaged, Theft, Spoilage, Obsolete, Miscount, Other — and rolls them up into a date-range PDF you can hand to an accountant or insurance adjuster. The system share sheet sends it anywhere your phone can reach: Gmail, Bluetooth, Messages, a network printer, or any installed app.
Out of Stock Filter
The Out of Stock filter chip narrows the list to only items at zero quantity — here, just the Aquarium Pump with a red Out of Stock badge. Pair it with the Low Stock chip to triage what to reorder next. The summary cards stay pinned at the top so you always see the totals while you're filtering.
Sell from Inventory
Tap the Sell button on any tracked item to open the Add to Cart sheet. Quantity defaults to 1 but you can crank it up to whatever's available — the sheet shows the on-hand count next to the field so you can't oversell. Unit Price pre-fills from the item's stored sale price; edit either field and the subtotal updates live. Add to Cart drops the line into the active POS session.
POS Session Cart
Adding to cart automatically jumps you to the Sell tab where the Session Cart is now live. The cart shows each line with its quantity multiplier and extended price, and a green Pay button at the bottom totals everything up. Tap the x on any row to remove it before checkout. Recent Transactions sits below for context — empty for the first sale of the day.
Checkout Payment Options
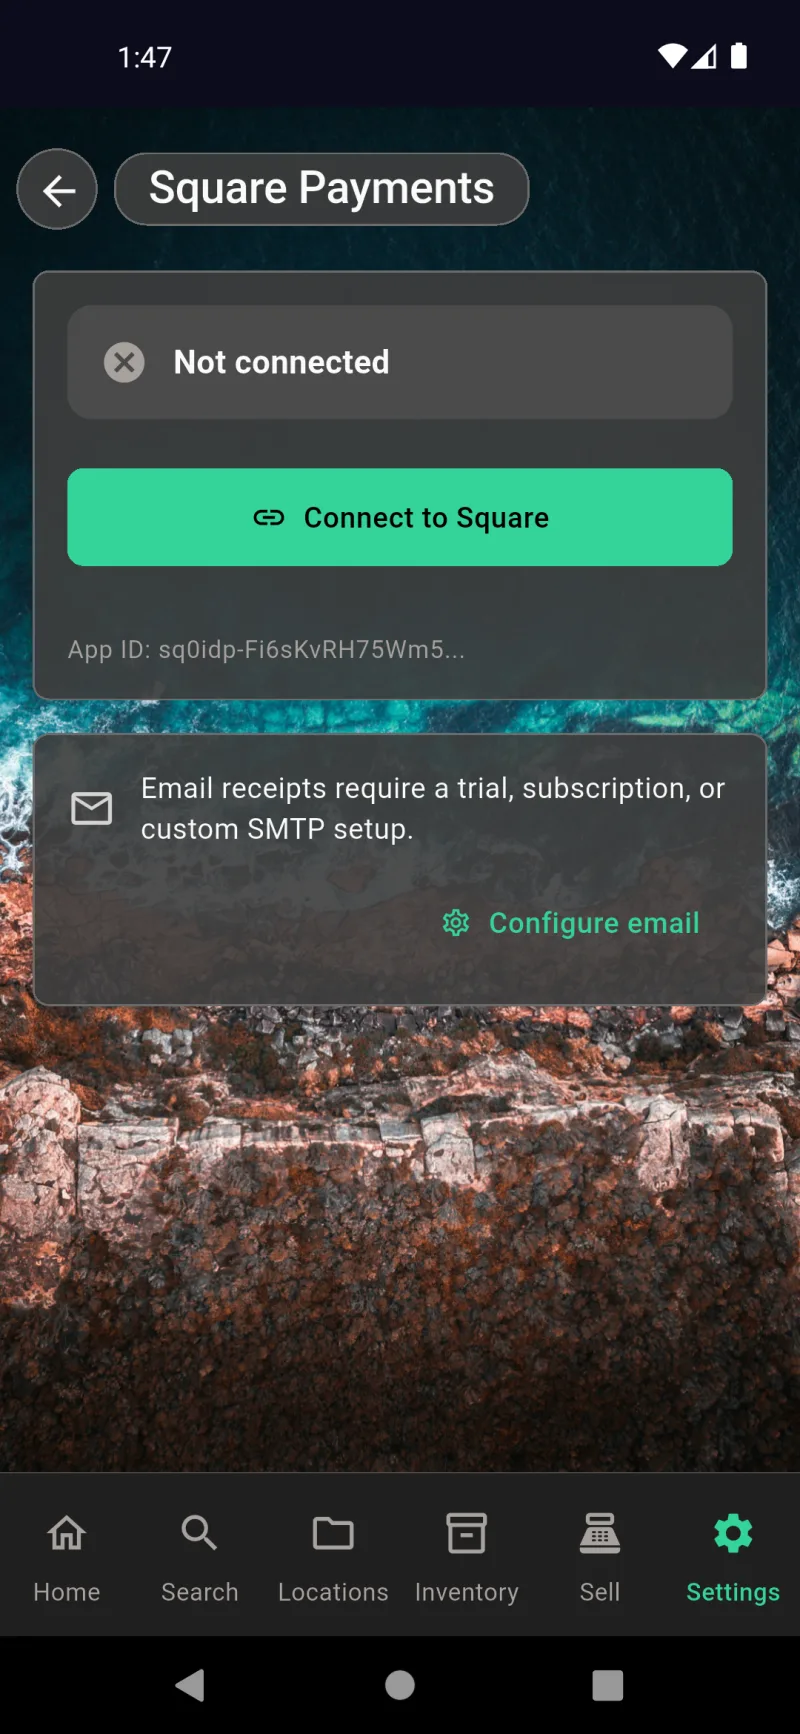
Checkout shows a one-screen breakdown — line items, subtotal, and three payment buttons: Card Reader, Manual Card, and Cash. Card options use Square if you've connected it under Settings → Sales → Square Payments; Cash is always available offline. Pick a method, tap Pay, and the rest of the flow takes over.
Cash Payment & Change
The Cash Payment dialog handles the math for you. Type the amount the customer handed over and the Change due figure updates live in green. Hit Complete Sale to record the transaction, decrement inventory, and mint a receipt. Cancel backs you out without touching the cart.
Receipt Confirmation
After a successful sale you land on the Thank You! receipt with a unique receipt number, every line item, the total, the amount paid, and the change handed back. The language picker at the top lets you switch the on-screen receipt to whatever the customer reads — handy in mixed-language storefronts. Tap Done to clear the cart and start the next sale.
Receipts in Any Language
Same receipt, one tap later, fully translated to Español — ¡Gracias!, Total, Pagado, Cambio. The receipt template is wired to the app's localization layer, so anything the catalog supports works here too. The customer reads in their language while you stay in yours.
Email the Receipt
Want a copy in the customer's inbox? Tap the receipt's email icon to open Email Receipt, type their address, and hit Send Receipt. Email delivery uses your configured mail service from Settings → Sales → Email Options — either the built-in Where The Bleep service or your own SMTP server. Skip wraps up the sale without sending anything.
Sales Recorded Instantly
Back on the Sell tab, the just-completed sale has rolled up into Today's Summary — Sales, Returns, and Net totals plus a fresh row in Recent Transactions showing receipt number, payment method, time, and amount. Tap any row to reopen the receipt, refund a line, or resend it. The icons next to Recent Transactions sync, filter by date, and export the day's takings.
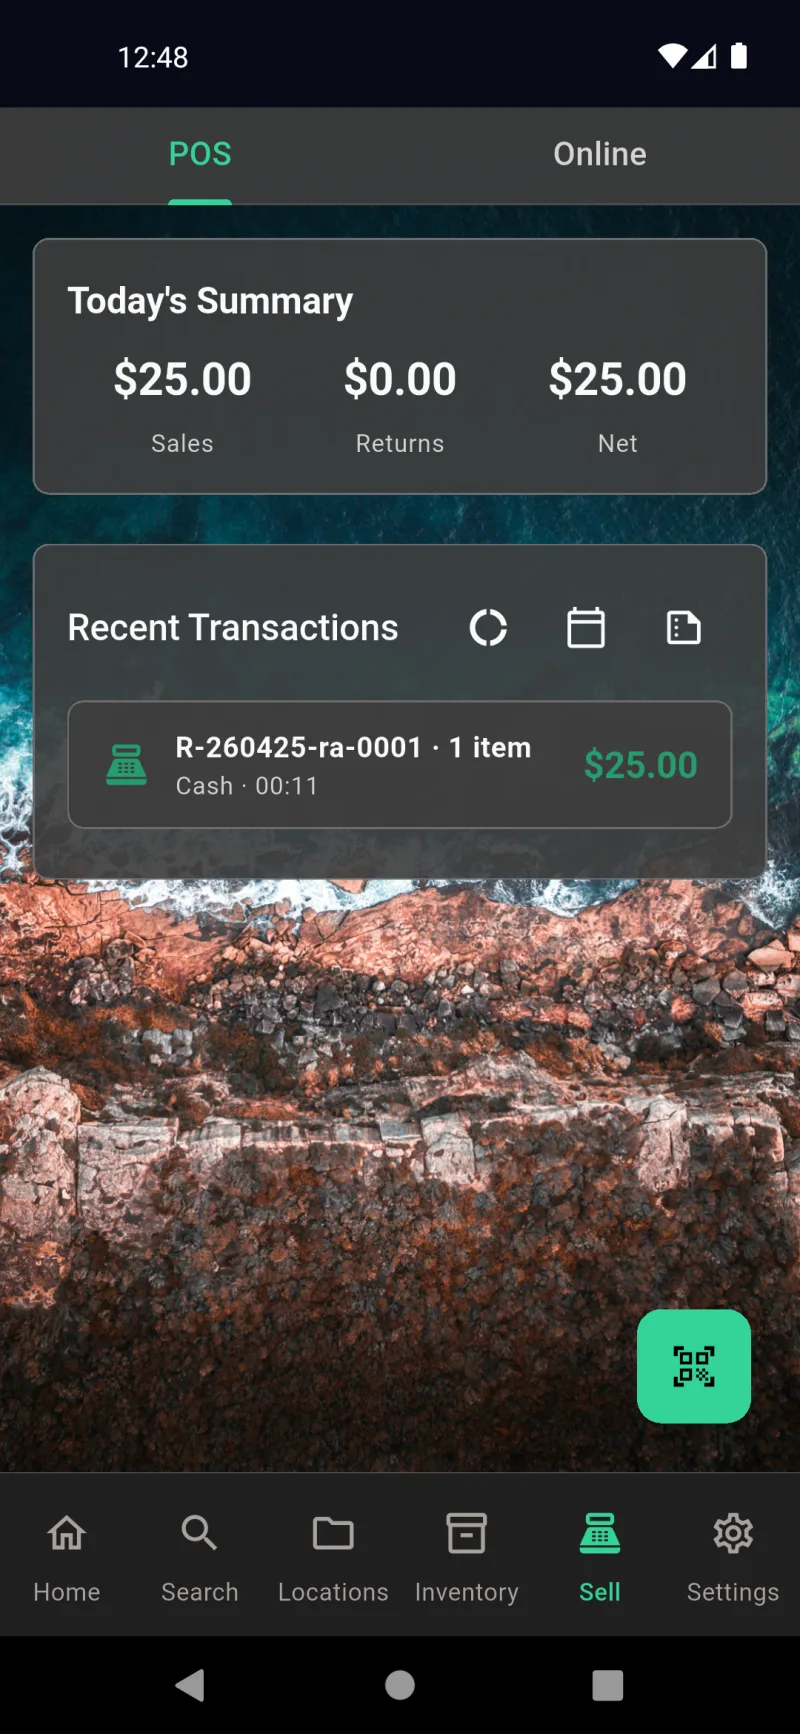
Square POS
Today's Summary At A Glance
The Sell tab opens on POS by default, with Today's Summary right at the top — sales, returns, and net for the current day. Below it, Recent Transactions lists every sale you've rung up, with the receipt number, payment method, line-item count, and total. The green QR button in the bottom corner is your scan-in entry point. Switch the top tab to Online when you want to manage marketplace listings instead.
Scan To Sell
Tapping the QR button drops you straight into the live scanner. The Sales / Returns toggle at the top decides whether each scan adds to a sale or starts a refund. The cart sheet sits at the bottom — empty for now, telling you to scan something to fill it. Drag the handle up at any time to see what you've added. The scanner reads UPC, EAN, Code 128, Code 39, and your own QR labels, so it works on both manufactured products and items you've labeled in-house.
Confirm Price And Quantity
When the scanner recognizes an item, this modal pops up pre-filled with the unit price you stored on the item (POS price, falling back to estimated value). Adjust the Quantity with the steppers — the available stock is shown next to the label so you can't oversell. Edit the unit price if you're running an ad-hoc discount. The subtotal updates live. Tap Add to Cart and the modal closes back to the scanner so you can keep adding items.
Session Cart Builds Up
After adding an item, the cart appears at the top of the POS tab with a running subtotal. Each line shows the item name, quantity, unit price, and line total. Tap the x to drop a line, or just keep scanning to add more. Today's Summary and Recent Transactions stay visible underneath so you can see the day's running totals while a sale is in progress. The big green Pay button starts checkout when the customer's ready.
Scan And Review Together
Back inside the scanner, drag the cart sheet up to expand it without leaving the camera. You see every line item and the total, and you can keep scanning while the sheet is open. Repeat-scan a piece-priced item and the quantity auto-increments instead of re-opening the modal — handy when a customer brings two of the same thing to the counter. Weight-based items re-open the modal so you can enter the new weight.
Pick A Payment Method
Hit Pay and Checkout shows the cart one more time before the money moves. Pick a payment method: Card Reader sends the total to your paired Square reader for tap or chip, Manual Card opens Square's keyed-entry sheet for phone orders, and Cash drops you into the change-making dialog. Card payments need a connected Square account — set that up under Settings → Sales → Square Payments. Tap Pay to commit, or Cancel to drop back to the cart.
Cash With Change Calculator
Cash sales open this dialog so you can punch in what the customer handed you. Change due calculates live as you type — no mental math at the register. The Complete Sale button stays disabled until the amount received covers the total. Tap it and the sale is recorded with the cash amount, change, and timestamp. The cart clears, inventory decrements, and the receipt screen takes over.
Thank You Receipt
After payment clears, the customer-facing receipt fills the screen — large text, big check mark, and a unique receipt number you can quote later. It lists every line item with totals, plus the cash amount paid and change due when relevant. Hand the phone over and the customer can review it. The receipt number is the same one stored in Recent Transactions, printed on any emailed copy, and included in your daily summary. Tap Done when they're finished and you're ready for the next sale.
Receipt In Any Language
The language picker at the top of the receipt is for the customer, not for you. Tap it, pick their language, and the entire receipt re-renders — Total becomes Total, Paid becomes Pagado, Change becomes Cambio. Useful for tourist towns, multilingual neighborhoods, or anywhere your buyers speak a different language than your store. The seller's app stays in your language; only the customer-facing screen flips.
Email Receipt In Their Language
Tap the language tile and the receipt re-renders in the buyer's language — Spanish, French, Japanese, whatever. Totals stay in your business currency, but every label (Total, Pagado, Cambio) flips on the spot. Their choice carries through to the next step too, so the email body shows up in the same language as the on-screen receipt. Nothing about the sale changes — same receipt number, same items, same payment method. It's purely there so the customer can read what they just paid for. When they tap Listo (Done), the seller-facing app snaps back to your language automatically.
Receipt Detail Anytime
Every transaction lands in the receipt history with its own detail page. You can pull this up later from Recent Transactions on the POS tab, or from a per-day list. It shows the receipt number, timestamp, payment method, total, and every line item exactly as it was sold. Use it to look up a sale a customer is asking about, to verify a tax-time export, or to undo a mistake. The receipt number is the same one printed on the customer's copy and emailed receipt — search by that string and you'll always land on the right sale.
Salespeople & Operators
Find Salespeople in Settings
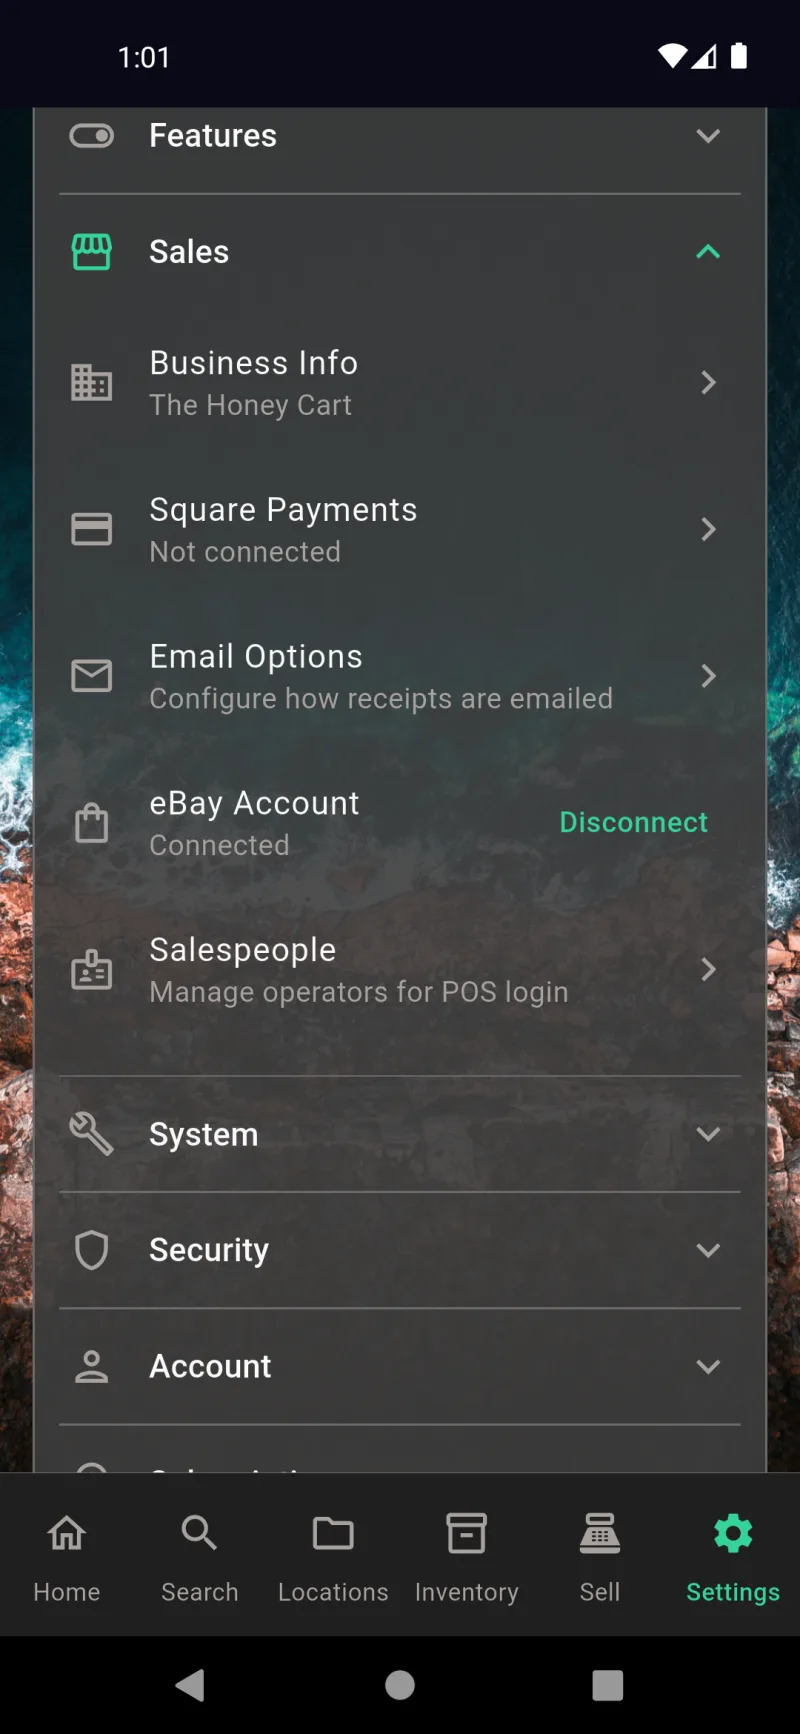
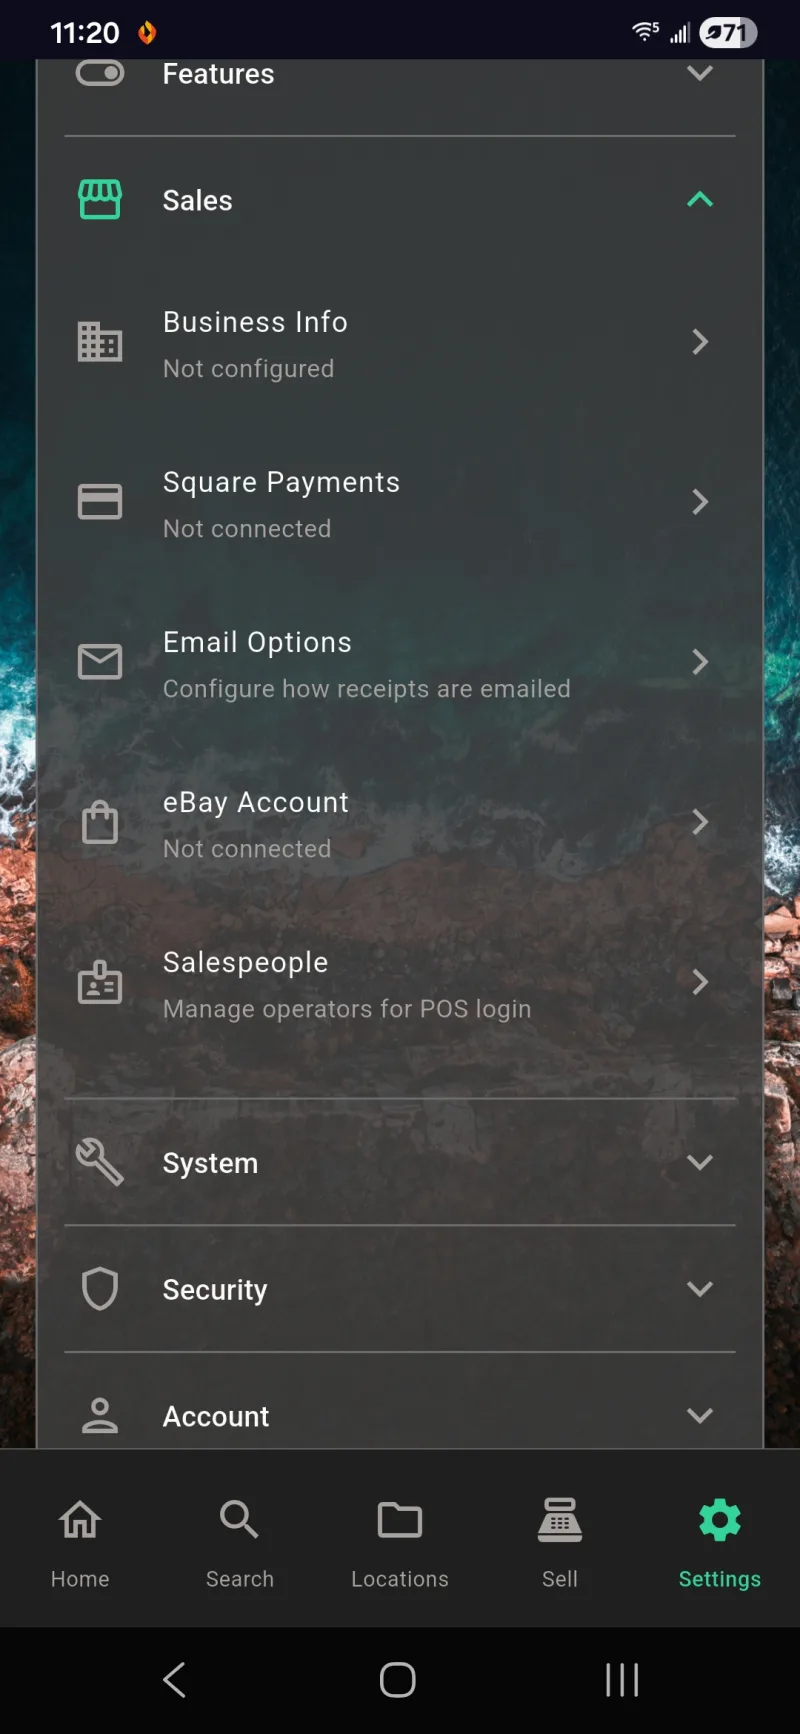
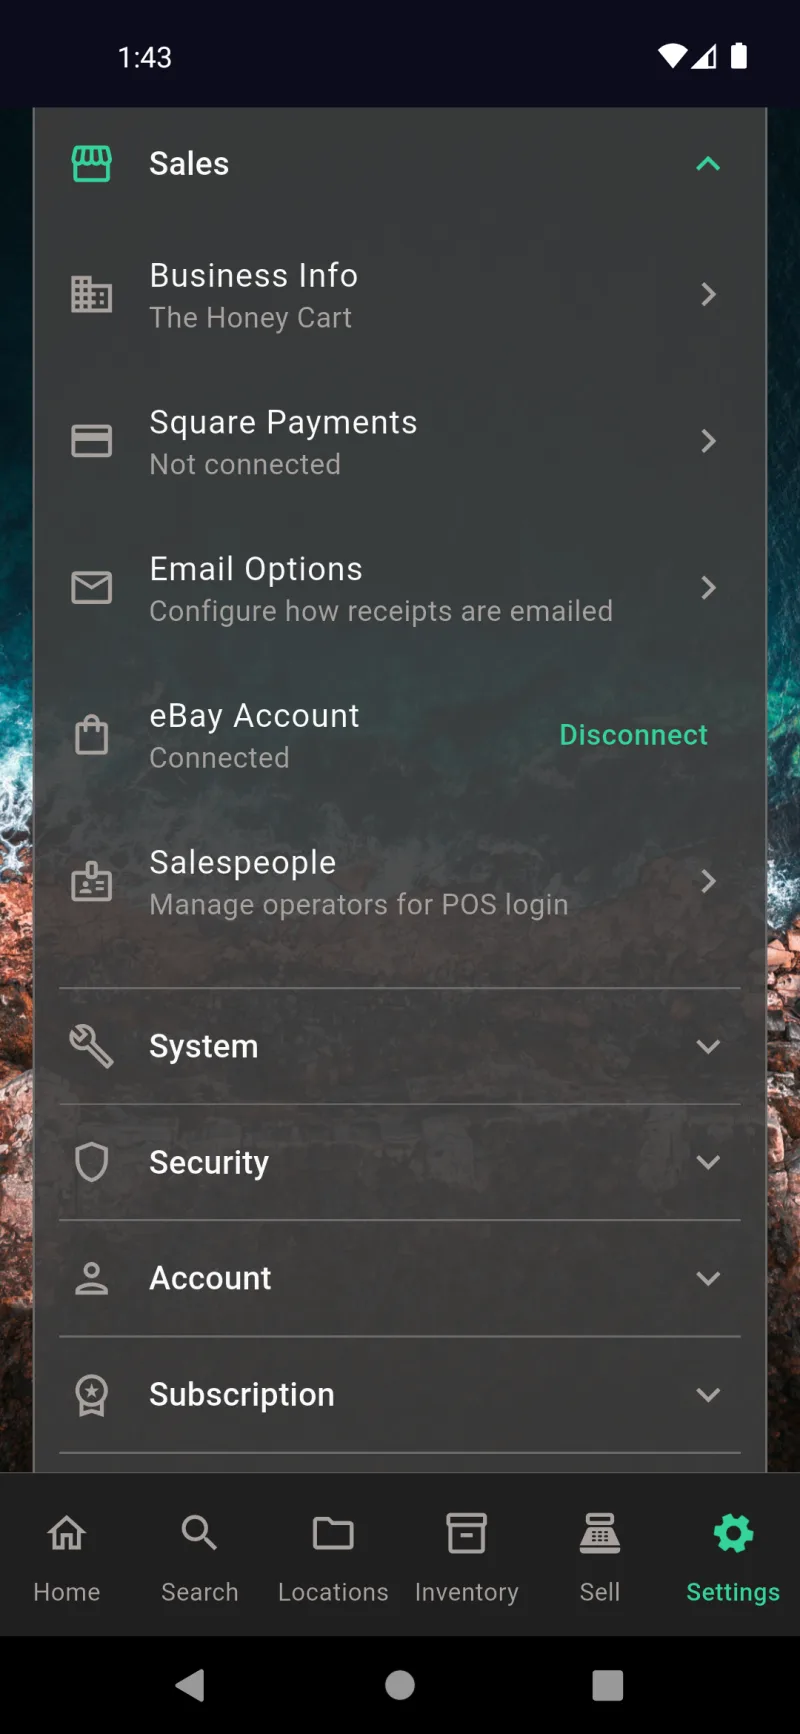
Operator management lives under Settings → Sales → Salespeople, alongside Business Info, Square Payments, Email Options, and your eBay account. The subtitle Manage operators for POS login is the giveaway — this is where you set up the people who'll ring up sales on shared devices. Tap the row to open the salespeople list. The whole Sales section is admin-only, so operators can't even see it.
No Salespeople Yet
On a fresh setup the list is empty — No salespeople yet with a hint that adding people enables the operator login screen on app launch. Until you add someone, the app skips the operator gate entirely and goes straight in as Admin. Tap Add Salesperson (or the + in the app bar) to create your first profile.
Add Salesperson Form
The Add Salesperson form takes a name, an optional PIN, and a Permissions block with Inventory Access, Reports Access, and Set Expiration toggles. The yellow No PIN set — anyone can use this profile warning means you're trusting whoever picks the tile to be honest about who they are. PINs are 0–6 digits and stored as a SHA-256 hash, never plaintext. Permissions default off so a new operator can ring up sales and nothing else.
Name and PIN
webDocsTeamSlide4Body
Default Sell-From Location
Down at the bottom of the form, Default sell-from location opens a Browse for storage location picker — scan the QR sticker on a shelf or browse your hierarchy manually. Setting a default means the operator skips the location prompt at login and POS pulls inventory from there automatically. Leave it as No default — prompt every sale if the operator works pop-ups, markets, or multiple shelves and needs to pick fresh each time.
Permissions and Expiration
Flip Inventory Access on so Sammy can adjust stock counts, and Reports Access so he can see Today's Summary and run reports. Set Expiration lets you auto-revoke these permissions on a date — handy for a temporary helper or a holiday hire. Permissions stack: every operator can sell, and these toggles add inventory and reporting on top. Hit the checkmark in the app bar to save.
Salespeople List
Back on the Salespeople list, Sammy now appears with a green PIN set badge and his Inventory, Reports tags. The three-dot menu on the right lets you edit the profile or remove it. Removing is a soft delete — historical sales still attribute to the operator, but they're gone from the login screen. Add as many salespeople as you need; each one shows up as a tile when the app launches.
Who's Selling?
Once you have at least one salesperson, the app boots into a Who's selling? picker instead of going straight in. Admin always sits on top with a shield icon, and each operator gets a tile below — a lock icon means PIN required, an arrow means it'll log in immediately. This screen is also reachable from the Signed in as… banner in Settings when you want to switch operators mid-shift.
Operator PIN Entry
Tap an operator with a PIN and you get a 4-dot keypad. Six wrong digits show Incorrect PIN and the dots reset — there's no lockout, but the hashed comparison means a stolen database wouldn't hand attackers usable PINs. Operators with no PIN configured skip this step and sign in immediately, which is fine for solo or trusted shops but not for a busy market booth.
Admin Encryption Password
If encryption is on, switching back to admin requires the encryption password. Biometric unlock works here too when you've enabled it under Settings → Security → Encryption & Security. This gate is what keeps an operator from poking around in admin settings — they can pick the Admin tile, but without the password they're stuck. If encryption isn't enabled, Admin signs in immediately without a prompt.
Where Are You Selling?
After login, you're asked Where are you selling today? — type a venue like \Portland Saturday Market\" so every receipt and POS transaction in this session is tagged with that location. Recently used venues appear below the field so you can tap one and skip ahead. Tap Skip if you're selling from your normal storefront and don't need a label. The location only sticks for the current session."
Signed In As Admin
Once Admin is signed in, the Settings root shows a Signed in as Admin banner with a Tap to switch operator or sign out hint. All sections — General, Features, Sales, System, Security, Account, Subscription, Support & About — are visible. Admins see the whole app and can change anything, including the salesperson roster, payment integrations, and security settings.
Admin Sales Settings
From the admin Settings root, expanding Sales gives you the salespeople entry alongside Business Info, Square Payments, Email Options, and eBay Account. This is the only place the operator roster lives — operators themselves can't see this section, so the team list stays admin-only by design. Tap Salespeople — Manage operators for POS login to add, edit, or remove people.
Operator Settings View
Sign in as Sammy and Settings looks completely different — only General and Support & About are visible, with a Signed in as Sammy banner up top. Sales, Security, Account, Subscription, and System are all gone. Operators can adjust display preferences and reach support, but they can't touch payment integrations, encryption, the operator roster, or anything that would expose admin data.
Operator Bottom Nav
Sammy's bottom nav is trimmed to Search, Inventory, Sell, and Settings. Home and Locations are hidden because his profile only has Inventory and Reports access — no full-app permission. The nav adapts per operator: an operator with no inventory permission would lose Inventory too. They get exactly the surfaces they need to ring up sales, no more.
Sell & Marketplace Listings
Connect Your eBay Account
Connect your eBay account before listing anything online. Open Settings → Sales → eBay Account — when it shows Not connected, tap it to launch the OAuth flow. eBay handles the sign-in inside its own page, then hands the app a token so Where The Bleep can publish, edit, and end listings on your behalf. The same Sales section is where you wire up Square Payments, Email Options, and Salespeople for in-store POS.
eBay Account Connected
After OAuth completes, the same row flips to Connected with a Disconnect link. Tokens refresh automatically in the background, so you typically only do this once per device. If you ever revoke access from eBay's side, just tap eBay Account again to reconnect — your saved business policies and draft listings stay put.
Sell Tab Online View
The Sell tab has two views: POS for in-person checkout and Online for marketplace listings. The yellow List an item for sale CTA at the top kicks off the listing flow. Below it, three sub-tabs — Active, Draft, and History — separate live listings from work-in-progress and from items you've already sold or ended. An empty Active list with a friendly hint is the starting state for a brand-new account.
Pick an Inventory Item
Tapping List an item for sale opens an item picker that searches your existing inventory. Type a few letters and matching items show up with their thumbnail and description — here, typing spea surfaces the Speaker System Guide. Listings always start from real inventory items so the photo, dimensions, condition, and AI-generated description carry into the listing automatically. Use the up arrow to import an item from a barcode scan, or the menu to switch between filters.
Choose a Marketplace
Pick where to list. Public Flyer generates a printable QR-coded sheet with your contact info — great for community boards. eBay, Facebook Marketplace, Nextdoor, Mercari, and OfferUp all show up as targets, with their per-marketplace title-length limits noted in the subtitle. Only eBay supports direct API publishing today — the others open a pre-filled draft for you to paste into their app or website.
Online or PDF on eBay
Pick eBay and a sheet asks How would you like to list on eBay? Choose Online to publish directly through the eBay API — your listing goes live the moment you tap List on eBay on the next screen. Choose PDF to skip the API entirely and produce a printable listing sheet you can share or hand to a buyer. Both paths use the same review form, so you can change your mind later.
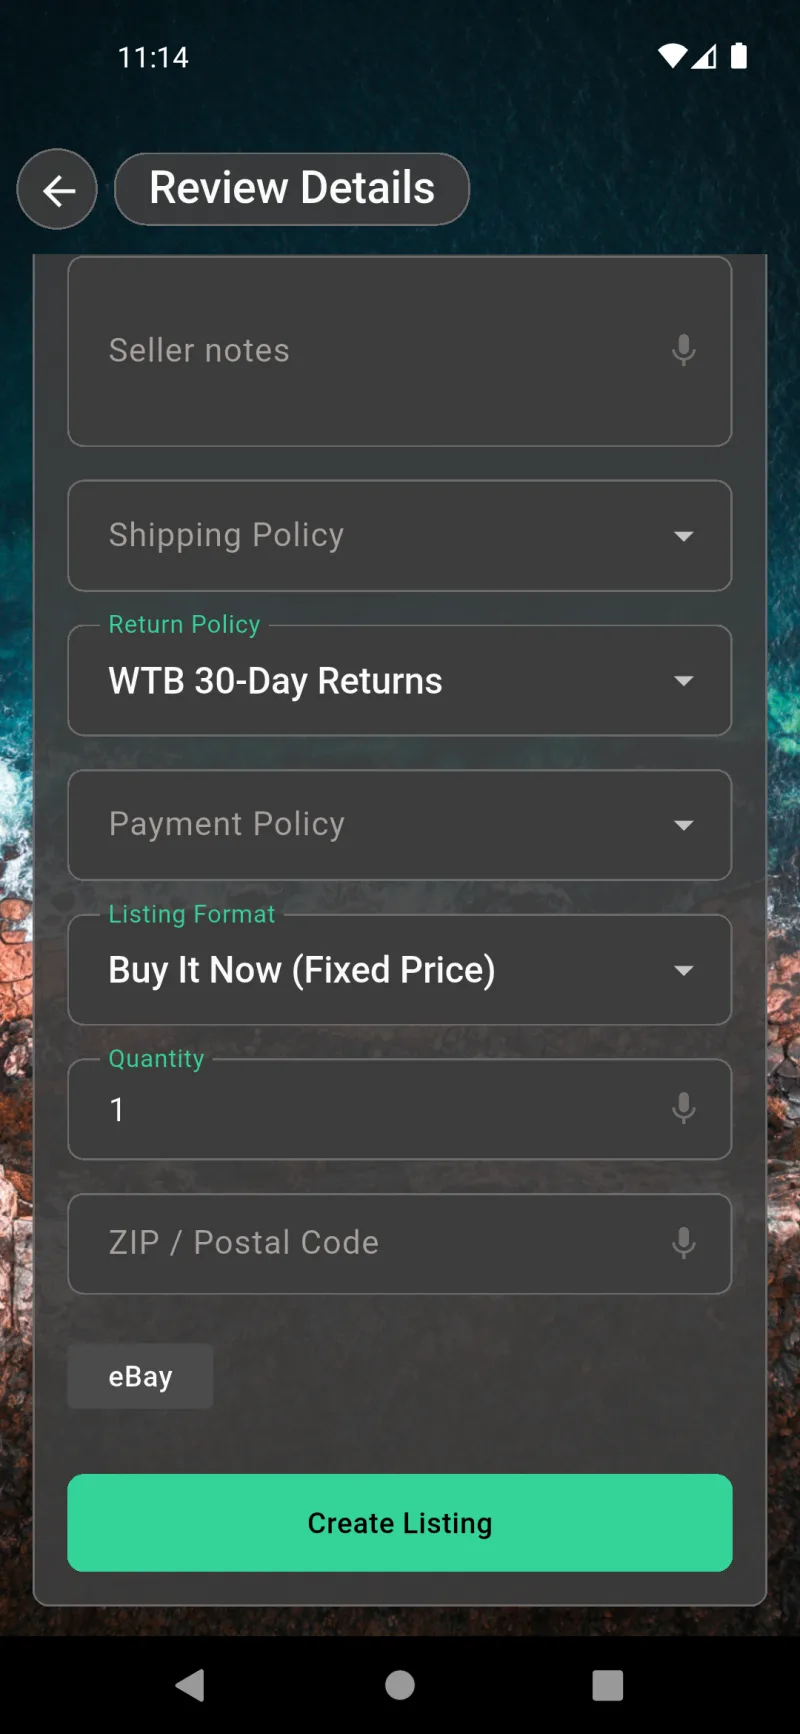
Review Details Form
Review Details is the universal listing form. Set the Asking price, write or dictate Seller notes, and choose your Shipping, Return, and Payment business policies — Where The Bleep ships with sensible defaults like WTB Standard Shipping and WTB 30-Day Returns, but you can pick policies you've configured in eBay. Listing Format toggles between Auction and fixed-price; pick Auction here to see bidding-specific fields.
Quantity and Ship-From ZIP
Scroll for Quantity (use this when an inventory record represents multiple identical units) and the ZIP / Postal Code the item ships from — eBay uses your ZIP to estimate shipping for buyers and to filter your listing into local results. The mic icons on every text field are voice input. Toggle voice and AI-write helpers under Settings → Features.
Auction Settings and Generate
Auctions add three more fields. Starting Bid is the price bidding opens at. Reserve Price is your private floor — eBay won't sell below it even if bidding stalls (leave it blank for no reserve). Auction Duration defaults to 10 Days but can run from 1 to 10. Tap Generate Listing and the AI fills in a marketplace-tuned title, description, and category from the item data so you don't start from a blank form.
Going Live on eBay Warning
Review Listing is the eBay-specific stage. The yellow Going Live on eBay banner is the last warning before a real listing goes up — once you publish, buyers can purchase immediately and you'll have to cancel from Seller Hub if you change your mind. Required fields are marked with a red asterisk. Title, Suggested Price, and Description are pre-filled from your inventory item, and Condition defaults to Used - Very Good. Category is empty here because eBay needs you to pick the right one before publishing.
Pick an eBay Category
Tap Category to open eBay's category picker and choose where the listing belongs — here it's set to Books (Books & Magazines). Picking the right category drives which extra eBay fields you'll see further down (book listings ask for ISBN, electronics ask for model number, etc.). The Condition dropdown switches from the generic Used - Very Good to Very Good because that's the eBay-approved label for the chosen category. Both fields are required before eBay will accept the listing.
Description and eBay Fields
Scroll down to confirm the long-form Description, choose an Image Size for how photos render in the eBay listing template, and fill the eBay Fields block. Brand, UPC / EAN / ISBN, and Package Weight all live here. If you don't have a barcode, type None in the UPC field — eBay accepts that for items without one. Toggle AI-generated descriptions under Settings → Features → AI Prompt Settings if you'd rather not write the body yourself.
List on eBay or Save Draft
At the bottom you set Package Weight and Weight Unit (lb or kg) — eBay uses these to calculate shipping at checkout. The green List on eBay button publishes immediately. Save as Draft stores the listing locally so you can come back later, edit it, and publish from the Sell tab when you're ready. Drafts never touch eBay until you tap Edit & Publish.
Publishing to eBay
After you tap List on eBay, the button switches to a Publishing to eBay… spinner while the app uploads photos, sends the listing payload, and waits for eBay's confirmation. If eBay rejects something — a missing field, a category that needs more attributes, an over-length title — the form scrolls back to the failed field with a red error so you can fix it without re-typing the rest.
Retry After Fixing Fields
Once you've corrected the missing eBay fields, tap List on eBay again and the Publishing to eBay… state comes back. eBay's API can be picky about brand, weight, and category-specific attributes, so it's normal to publish twice on the very first listing of a new category. Subsequent items in the same category remember the choices.
Listed on eBay Success
Success — the green check and Listed on eBay! headline confirm the listing is live. Any non-fatal warnings from eBay (like the system note about pending-payment holds for new sellers) show in the yellow Warnings box so you know what to expect. View on eBay opens the live listing, Manage in Seller Hub jumps to eBay's seller tools, Create Listing Sheet generates a printable PDF, and Cancel Listing ends it on eBay.
Done and Back to Sell
Scroll past the action buttons to the green Done button and you're back on the Sell tab. The item now lives in Active on the Online view with an eBay tag and the live price. Where The Bleep also marks the inventory record as Listed so the same item won't accidentally show up in your in-store POS cart while it's for sale online.
Live Listing on eBay App
On eBay's mobile app the listing looks like any other — Buy It Now Price $12.00, Time left 9d 23h, and live counters for Bids, Bidders, Watchers, and Views. From here you can Revise listing, End item, or Sell similar item right inside eBay. Where The Bleep stays in sync — when the auction ends or sells, the inventory item flips from Listed to Sold.
Seller Hub Active Listings
On desktop, your listing appears under Listings → Active in eBay's Seller Hub. The title, SKU, current price, and Buy It Now price all match what Where The Bleep submitted, and the SKU is a UUID so the app can match the listing back to the original inventory record on the next sync. Use Edit, Sell similar, or the Actions menu directly from Seller Hub for anything you'd rather change in eBay's tools.
Manage From Anywhere
The same Seller Hub view in mobile Chrome shows the synced listing too — Auction format, current price $5.00, Buy It Now $12.00. Whether you manage from the eBay app, Seller Hub on desktop, or Where The Bleep itself, you're looking at the same live listing. Pick whichever surface is in front of you.
Orders Awaiting Shipment
When a buyer purchases, the order shows up under Orders → Awaiting shipment in Seller Hub. You'll see the buyer username, their ZIP code, the SKU that links back to your inventory item, and quick actions for Shipping, Print coupon, and Message buyer. eBay handles the money side; Where The Bleep handles the inventory side and quietly marks the item Sold on the next sync.
Online Tab Active Listings
Back in Where The Bleep, the Sell → Online → Active tab now shows the Speaker System Guide as a live eBay listing for $12.00 with the eBay logo on its row. Tap any active listing to see the live price, time remaining, and the same management actions you'd find in Seller Hub. The Draft tab holds anything you've saved but not published, and History tracks listings that have ended or sold.
Draft Listings and Mark as Listed
Drafts get their own detail screen with the photo, a yellow Draft Listing badge, and chips for every marketplace you've drafted to (here, multiple eBay drafts). The orange Edit & Publish button reopens the Review Listing form so you can finish and submit it. Mark as Listed is for when you actually published outside the app — for example through the Public Flyer flow or by handing a buyer a PDF — so the inventory item still flips to Listed status.
Receipts
Connect Square & Email
Open the Square Payments screen under Settings → Sales → Square Payments to wire up card readers and surface email receipts. Tap Connect to Square to run the OAuth flow and pick a location — once connected, the App ID is shown for support reference. The mail panel below is the bridge to receipt delivery: email receipts need either an active subscription (so the built-in Where The Bleep mail service can send on your behalf) or your own SMTP server. Tap Configure email to jump straight to the Email Options screen.
Email Options
Email Options chooses who actually delivers the receipts. Pick Where The Bleep mail service to send from receipts@wherethebleep.app — this is the easiest path and only requires an active trial or subscription. Pick Custom SMTP to send from your own domain by plugging in host, port, TLS, username, password, and from address; you can run Test Connection and Send test email right from the form. The active-subscription banner at the bottom confirms the WTB mail path is unlocked.
What Customers Receive
Here's what your customer actually receives — a clean transactional email from Where The Bleep <receipts@wherethebleep.app> (or your own from-address on Custom SMTP) with the receipt number, line items, quantities, and subtotal. The email body is rendered server-side in the language the buyer picked on the customer-facing thank-you screen, falling back to your app language if they didn't choose. A footer line reminds the recipient that the receipt was sent at their request, in case they don't recognize the sender.
Encryption & Security
webDocsEncryptionSlide1Title
Encryption and account security live across three Settings tabs. The Sales tab handles business-side credentials — Square Payments, eBay, and email. Encryption keys, biometric unlock, two-factor auth, and certificate checks live one tab down under Security. Your sign-in identity, password, and account deletion live under Account. This first slide is your map — every screen in this section sits behind one of those three section headers, and you'll usually only visit them when you set the app up or rotate something later.
Settings → Security
The Security section under Settings holds the three big knobs for protecting your data. Encryption & Security opens the master controls for your end-to-end encrypted vault, biometrics, and recovery phrase. Two-Factor Authentication pairs an authenticator app for an extra login factor. Certificate Monitoring watches the TLS certificates on every API your app talks to and flags unexpected changes. Each row is a deep-link into a focused screen — open the ones you actually want to configure.
Settings → Account
The Account section is your sign-in identity rather than your encryption setup. Password changes the password that unlocks the vault. Remember Me shows whether auto-unlock is active and for how many days — tap Forget to revoke it on this device. Sign Out shows your current cloud-sync email and stops syncing without deleting local data. Delete Account at the bottom (in red) is the irreversible wipe.
Square Payments
Square Payments under Settings → Sales → Square Payments is one of the most security-sensitive integrations. The OAuth flow opens Square's site, authorizes the app, and stores the resulting access token in your encrypted vault — nothing is held in plain text. The App ID under the button is non-secret and only identifies the integration. The reminder card explains that emailing receipts requires a paid trial, subscription, or your own SMTP server.
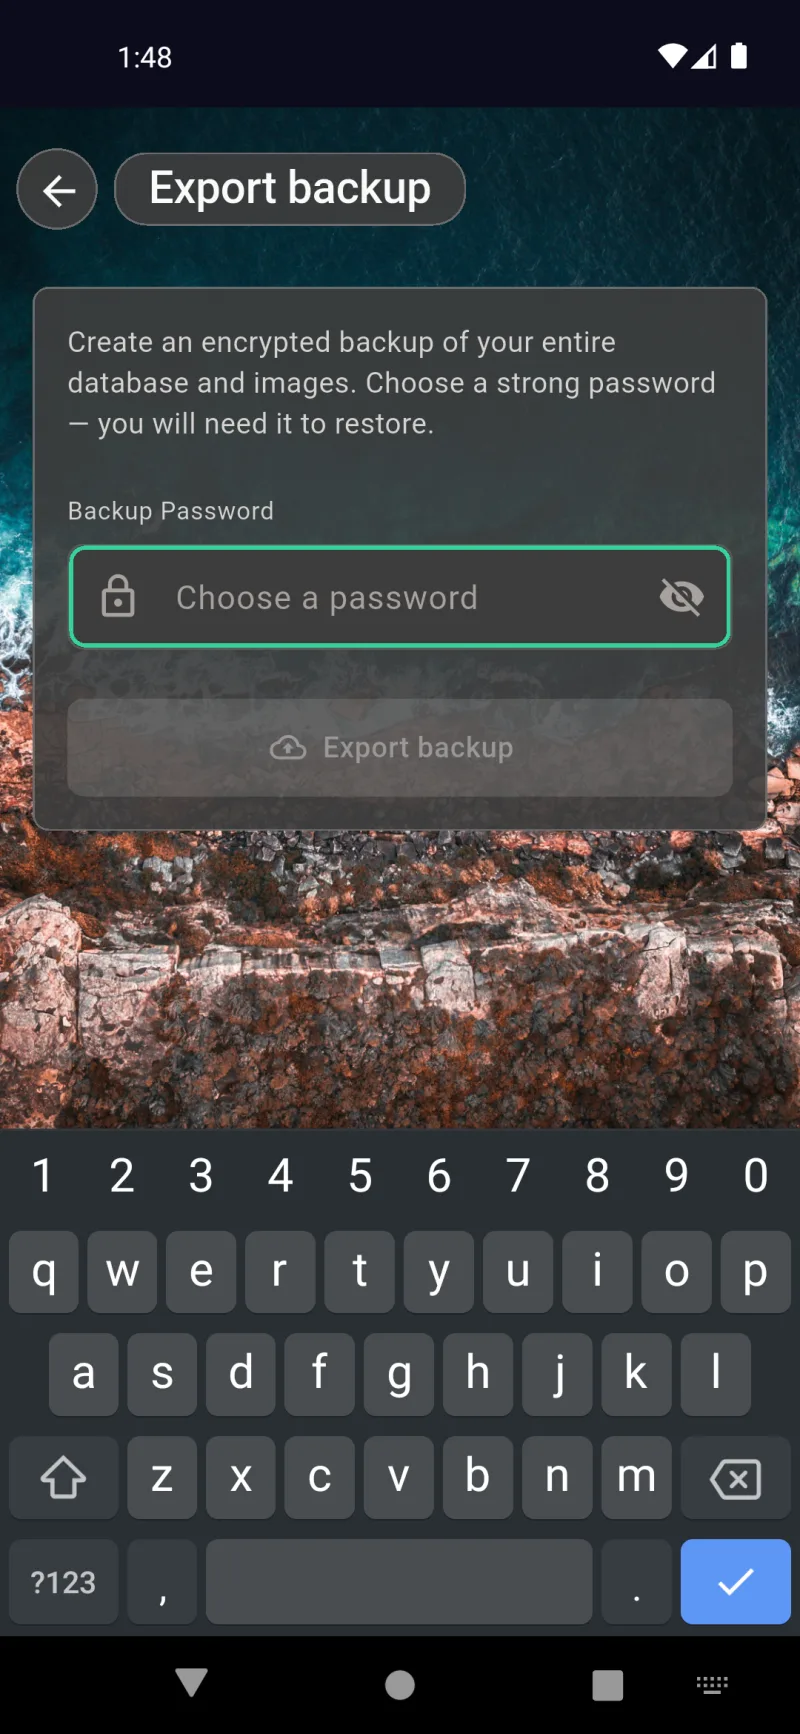
Encrypted Backup Export
Local backups from Settings → System → Export backup are encrypted with a password you choose right here. The backup contains your entire database and images, sealed so that no one — not even Where The Bleep — can open the file without this password. Pick something strong and store it somewhere safe. There is no admin override or password reset for backup files; if you forget it, the backup is unrecoverable.
Restore Backup
Restore reverses the export. Pick a backup file and enter the same password you used when you created it, and the app will decrypt it and replace the current data on this device. This is how you migrate to a new phone or roll back after a bad import. The wording is intentional — restore is destructive on the device that runs it, so do it on a fresh install or after exporting your current state first.
Encryption & Security
Settings → Security → Encryption & Security is the master switchboard for your zero-knowledge vault. The teal banner at the top confirms encryption is active — every item, photo, and field synced to the cloud is sealed before it leaves the device. View Recovery Phrase shows your 24-word BIP39 backup; print it or write it down and store it somewhere safe so you can restore the vault if you forget your password. The red Danger Zone at the bottom holds the irreversible Delete Account flow.
Two-Factor Authentication
Two-factor authentication adds a second layer on top of your password — a 6-digit code from an authenticator app that rotates every 30 seconds. From Settings → Security → Two-Factor Authentication, tap Set Up Authenticator App, scan the QR code with Google Authenticator, Authy, 1Password, or Microsoft Authenticator, and enter the first code to confirm. Once it's on, signing in on a new device needs both your password and a fresh code from the app — so even a leaked password isn't enough.
Certificate Monitoring
Certificate Monitoring (under Settings → Security → Certificate Monitoring) records the TLS certificate fingerprint of every API endpoint the first time the app connects, then re-checks on a schedule and warns you if it changes unexpectedly — a classic signal of a man-in-the-middle attack. Tap Run All Checks to refresh on demand. Each card shows the issuer, expiry, fingerprint, and the dates the certificate was first and last seen for endpoints like Supabase and your AI provider.
Change Password
Rotate your encryption password at any time from Settings → Account → Password. New passwords must be at least 12 characters. Toggle Sign out other devices on if you're rotating because you suspect a leak — every other paired device will then need to sign in again with the new password before it can sync. The button at the bottom links to recovery-phrase entry in case you've lost the current password and need to bypass it with your 24-word backup.
Sign Out of Cloud Sync
Signing out only stops cloud sync — your local items, photos, and locations stay on the device exactly as they were, so you can keep working offline. You can sign back in later with the same email and password and your encrypted vault will reconnect to the cloud. Use this if you're handing the phone off temporarily or want to stop pushing changes to other paired devices without wiping anything.
Delete Account
Account deletion is the nuclear option and lives under Settings → Account → Delete Account. The first step verifies your encryption password so a thief with an unlocked phone can't trigger this. Step 2 makes you type a confirmation phrase before the wipe runs. Deletion destroys every item, photo, document, cloud copy, and encryption key tied to the account — permanently, with no admin recovery. The teal tip at the bottom reminds you that a local backup file can still be restored after deletion if you saved one first.
Cloud Sync
Watch Sync Happen Live
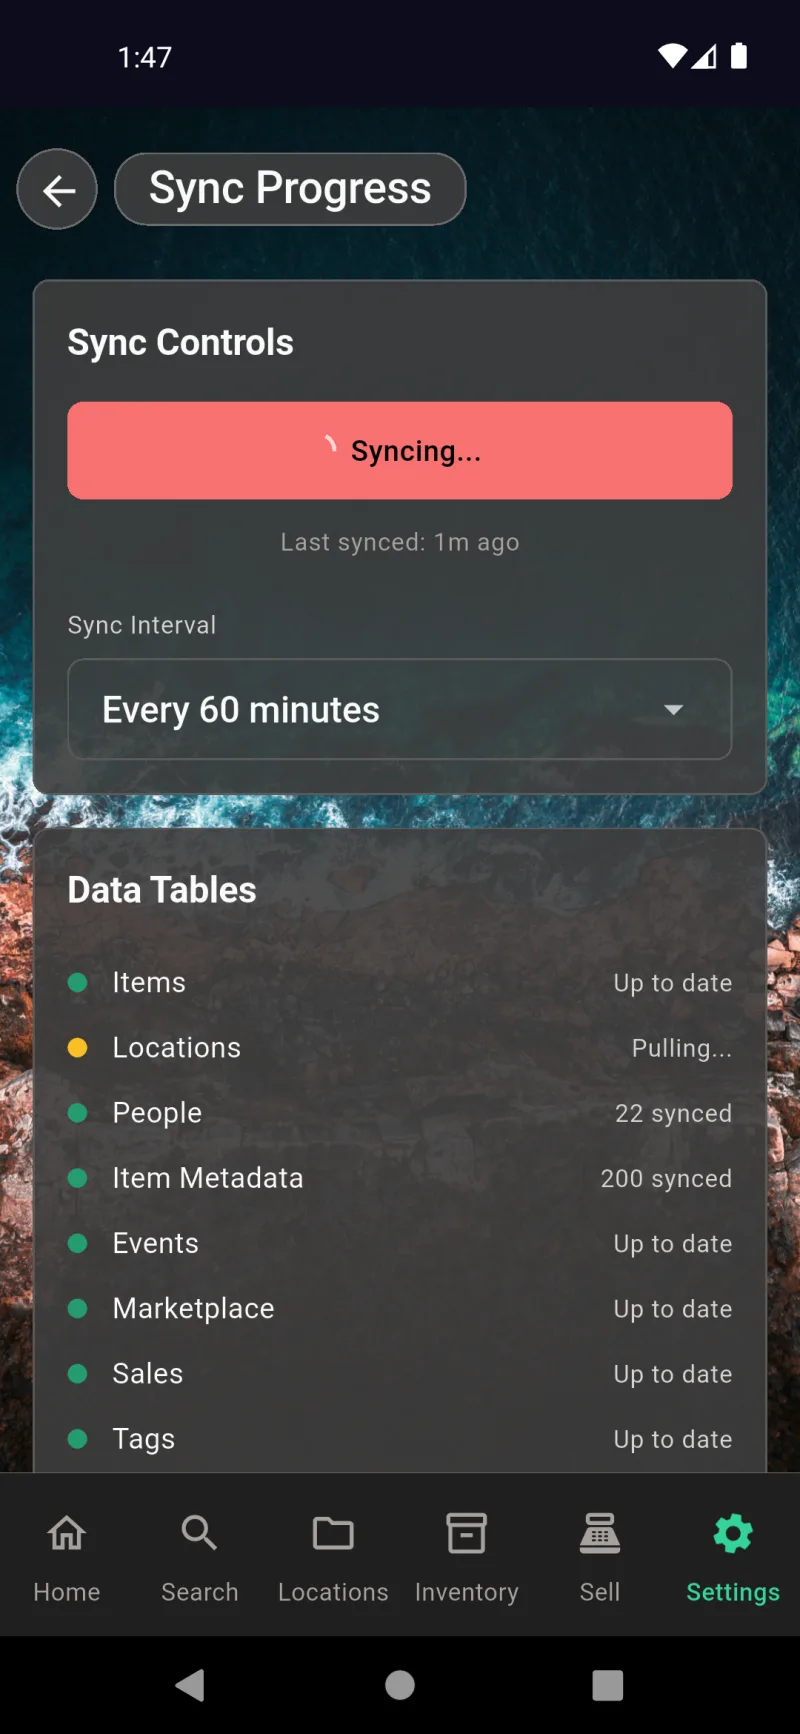
Open Settings → System → Sync Progress to see exactly what your phone is doing right now. The big Syncing… button doubles as a kill switch — tap it again to stop a run in flight. Below it, Sync Interval lets you trade battery for freshness, from every few minutes up to manual-only. The Data Tables list shows each table's state with a colored dot — green for up to date, yellow while pulling or pushing, plus per-table counts so you know how much moved on the last sync.
Devices and Account
Scroll down and you'll find the Sync Log shortcut, your Connected Devices roster, and the account card. Each device shows its platform, app version, and whether it's the one you're holding (This device), recently active, or last seen days ago. Tap the three-dot menu to rename a phone or sign it out remotely. The bottom card confirms which email you're signed in as and gives you a Sign Out button — that stops syncing on this device but keeps your local data intact.
Sync Log and Conflicts
Tap Sync Log to open a full timeline of every push, pull, and conflict. Each entry is timestamped and tagged with the table it touched — entries like pullLocations fetched 66 rows or Pushed 519, pulled 104, 0 conflicts tell you exactly what changed and whether anything failed. The trash icon up top clears the history once you've seen what you need. This is the screen to share with support if a sync ever looks stuck or if numbers between devices don't match.
Backup & Restore
Encrypted Local Backup
Reach this from Settings → System → Export backup. The app builds a single .bak archive containing your full SQLite database plus every item and location image, then encrypts it with the password you choose. Pick something strong — there is no recovery path if you forget it, because the password is the only key. After you tap Export backup, the system save dialog lets you drop the file anywhere your device can reach: local storage, an SD card, Google Drive, iCloud, or a USB transfer. Keep at least one copy off-device.
Restore From Backup File
From Settings → System → Restore backup, pick the .bak file you exported and enter the password used at the time. Restore is destructive — it overwrites your current database and image folder with the contents of the archive, so any items, sales, or photos added since that backup will be lost. When the restore finishes the app shuts itself down so it can reopen against the fresh data. This flow is also how you migrate everything from an old phone to a new one.
Data Export & Reports
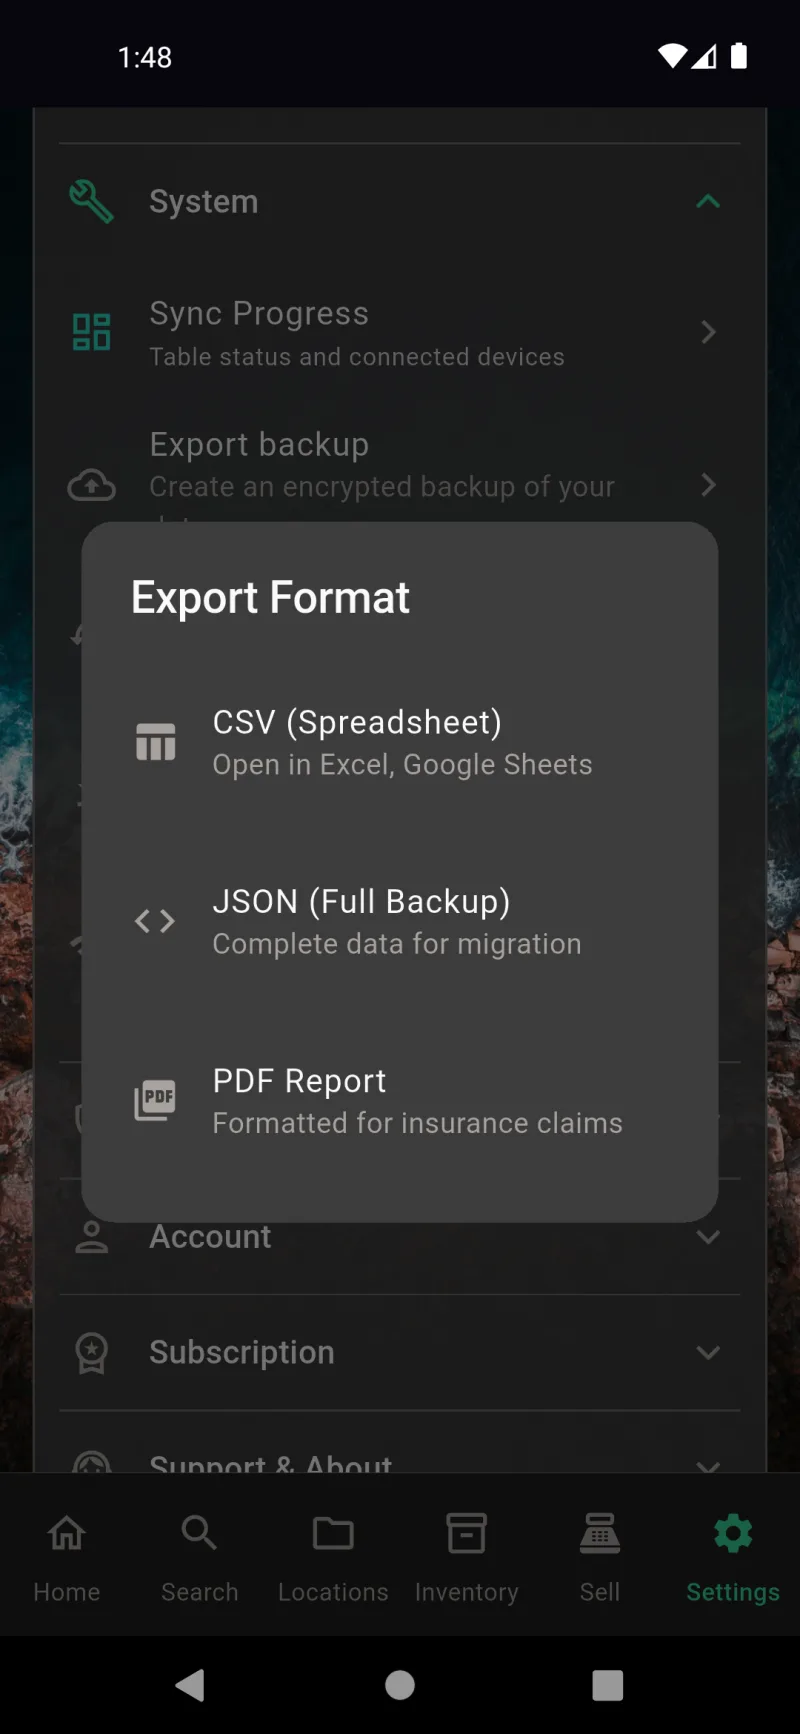
Pick An Export Format
Tap Settings → System → Export My Data and this dialog asks how you want your data shaped on the way out. CSV (Spreadsheet) bundles items, locations, people, categories, tags, marketplace listings, and sales into separate files you can open in Excel or Google Sheets — handy for ad-hoc analysis or one-time imports elsewhere. JSON (Full Backup) writes the complete dataset in a structured archive — the right pick if you're migrating to a new device or want a developer-friendly snapshot. PDF Report renders a formatted document with photos, values, and descriptions, designed to hand straight to an insurance adjuster after a loss. If encryption is on you'll be asked for your password first, and you can opt to bundle item images and documents into the archive on the next screen.

AI-Powered Descriptions
webDocsAiDescriptionsSlide1Title
Pick your Provider, choose a Model, and paste your API key — the eye icon hides or reveals what you typed. The PAID tag flags providers that bill you, while free options carry a green badge. Tap Get an API key from OpenAI to open the signup page in your browser, or View OpenAI Privacy Policy to see what each provider does with your data. Toggle Image Recognition to let AI auto-fill name, description, and tags from item photos, and Sales Descriptions to draft marketplace listings. Both default off until you save a key. Find this under Settings → Features → AI API Settings.
Tune How AI Describes Items
The Prompt preset dropdown gives you Concise, Detailed, or Custom — switch between them or write your own instructions in the Prompt instructions box. The default Concise prompt tells the AI to focus on the main object in the center of the photo and describe what it IS, not what it's doing, which keeps generated names short and useful. Use the mic icon to dictate longer custom prompts. Tap Save prompt to apply your changes to every future image-recognition run. Find this under Settings → Features → AI Prompt Settings.
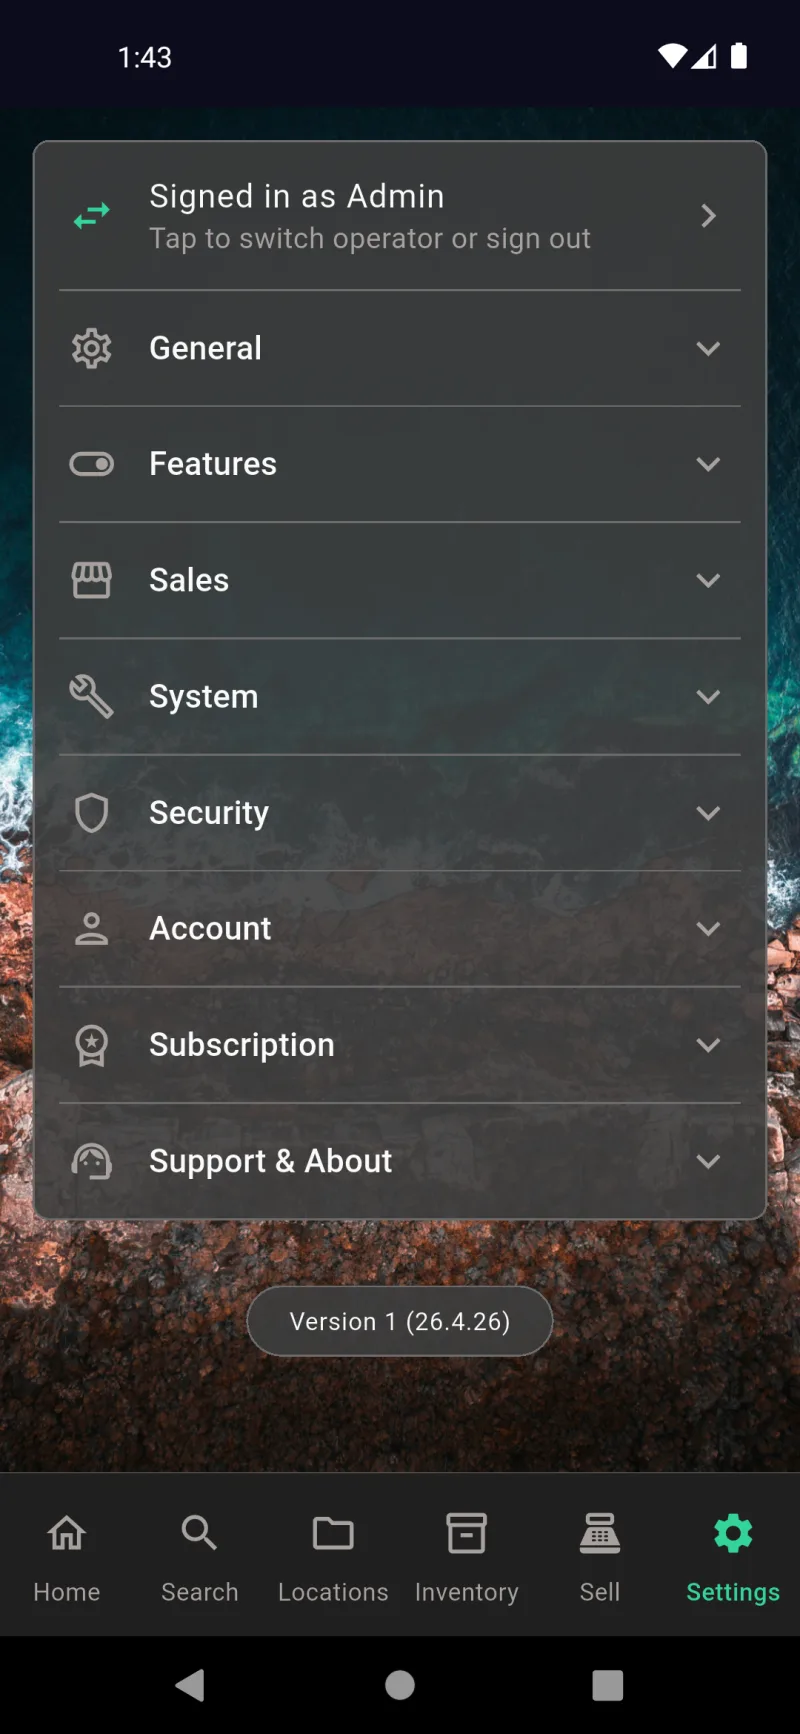
Settings
Settings Home
Settings is your control panel — every preference, integration, and account action lives behind one of these eight collapsible sections. The banner at the top shows whether you're signed in as Admin or as an operator, and tapping it lets you switch profiles or sign out. The version number at the bottom is what you'll quote when reporting bugs to support.
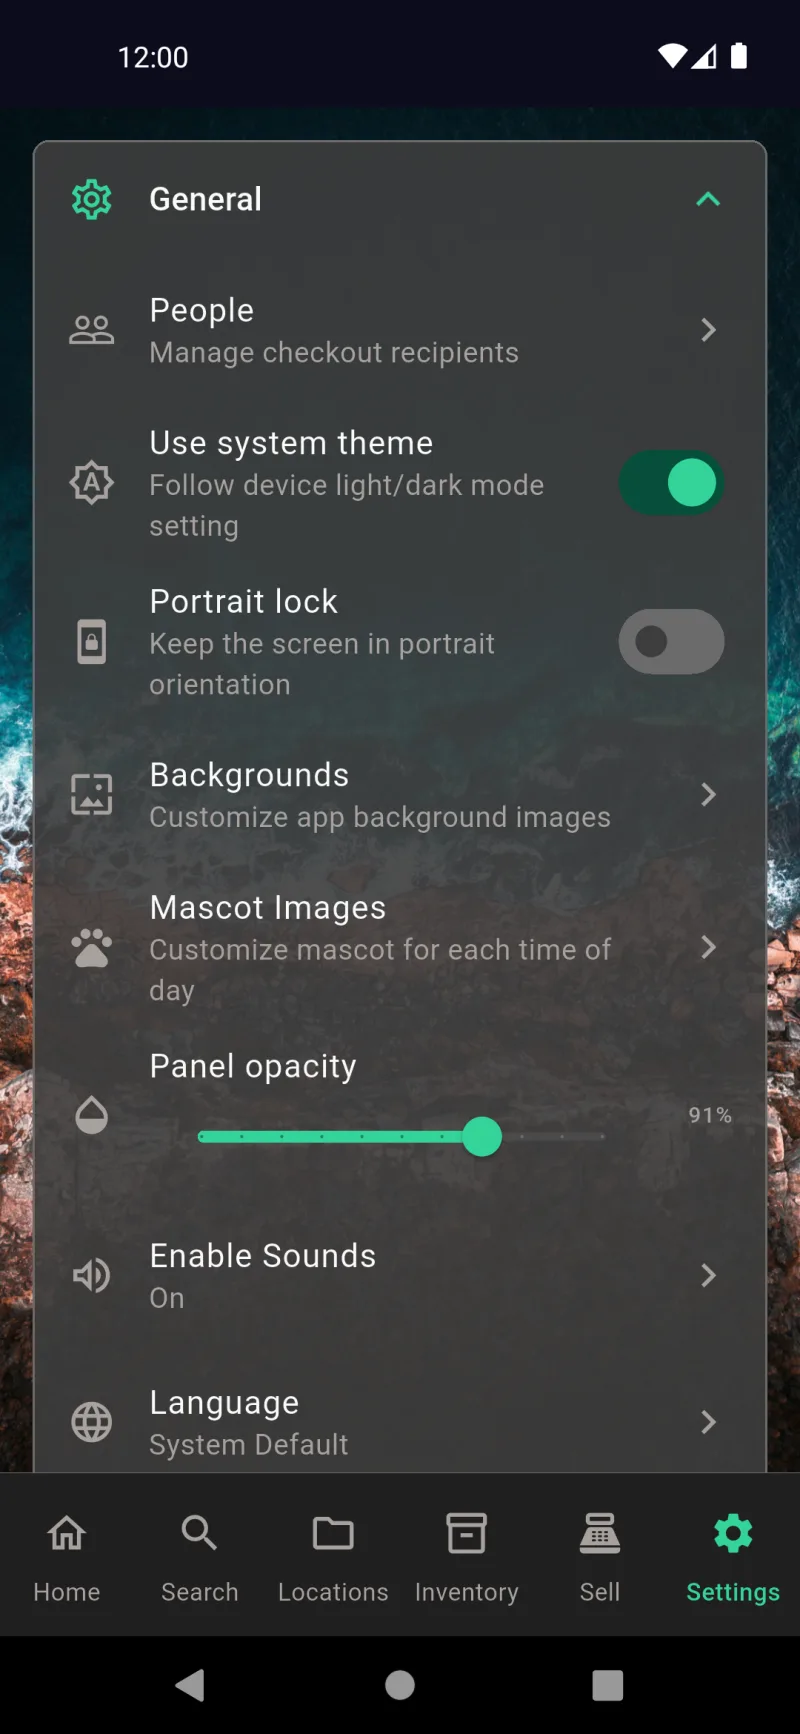
General Section
General is the cosmetic and personal-preference section. Manage your People list (loan recipients), follow your phone's light/dark mode, lock to portrait orientation, change Backgrounds and Mascot Images, slide Panel opacity to make cards more or less translucent, customize Sounds, and pick a Language. Nothing here affects your data — just how the app looks and feels.
Features Section
Features is where you turn whole subsystems on and off. Disable Inventory if you only use the app for personal storage tracking, hide the Sales tab if you don't sell anything, or kill Online Sales if marketplaces aren't your thing — the navigation bar updates instantly. Below the toggles sit links to Category Views, Print Options, and the two AI configuration screens.
Sales Section
Sales houses the integrations that make commerce work — Business Info for the name and address that print on receipts, Square Payments for card processing, Email Options for receipt delivery, eBay Account for marketplace listings, and Salespeople for managing operator logins. This section only shows when Sales is enabled in Features.
System Section
System is the data and infrastructure section. Sync Progress shows what's syncing and which devices are connected. Export backup and Restore backup handle encrypted full-database snapshots. Export My Data spits out CSV, JSON, or PDF for analysis or insurance. Connectivity diagnoses network problems by pinging each upstream service.
Security Section
Security covers the cryptographic side. Encryption & Security manages your end-to-end encryption keys and recovery phrase. Two-Factor Authentication adds an authenticator-app code on top of your password. Certificate Monitoring watches the TLS certs on the API endpoints the app uses, so a man-in-the-middle attack can't sneak past unnoticed.
Account Section
Account is the per-user section. Password rotates your encryption password. Remember Me shows whether biometric auto-unlock is active and how many days remain — tap Forget to clear it. Sign Out disconnects from cloud sync without erasing local data, and Delete Account permanently destroys everything tied to the account.
Subscription Section
Subscription shows your current plan status — Free Trial countdown, active subscription, or expired — and a View Plans button that jumps to the upgrade screen. While you're on a trial, this is where you'll watch the days tick down. Once you subscribe, this section becomes your billing dashboard.
Support & About
Support & About is the help and legal section. Support opens the contact form for questions or bug reports. Privacy Policy, Terms of Service, and End User License Agreement open the corresponding documents in your browser — useful for compliance, audits, or when you just want to know what you agreed to.
People
The People list is the same recipient roster you saw on the home dashboard, reachable here under Settings → General → People. Tap any contact to edit their phone, email, address, relationship, or notes. The green plus button creates a new person, and the search box at the top filters as you type — handy when your borrower list grows past a screenful.
Backgrounds
Backgrounds lets you swap the photo or gradient that shows behind every screen. Light Mode and Dark Mode get their own settings so the app stays readable in either theme. Pick from the bundled wallpapers or tap Choose Image to use one from your camera roll. Combined with the panel-opacity slider, this is how you make the app feel like yours.
Mascot Images
The mascot is the little character that pops up around the app — and you can swap him out by time of day. Set a different image for Morning, Afternoon, Evening, and Night, or hit Reset to bring back the defaults. Recommended size is 120×120 pixels, but the app will auto-resize whatever you upload. Square images look best.
Sound Tones
The Sounds screen lets you pick the audio that plays for every event in the app — scan success, item added, sale complete, scan error. Each category has its own list of tones (Classic Bleep, Gentle Chime, Quick Chirp, Warm Pulse, Retro Blip, Soft Echo, Double Tap). Tap any sound to preview it. Flip the master Enable Sounds toggle off when you need silence.
Sound Categories
Collapsed, the Sounds screen shows the four event categories you can customize. Each one expands into its own list of tones, so the bleep that confirms a barcode scan can be different from the chime that celebrates a completed sale. Mix and match until the audio feedback fits how you actually use the app.
Language
Language overrides the system default with a specific locale. The app ships translations for over a dozen languages including Arabic, Chinese (Simplified), Dutch, English, French, German, Hindi, Indonesian, and Italian. Pick System Default to follow whatever your phone is set to. The change takes effect immediately — no restart needed.
Category Views
Category Views control which fields appear on item detail screens for each category. Books, Clothing, Collectibles, Electronics, Furniture, Sports, Tools, and Other each have their own preset, plus a Default fallback for anything uncategorized. Tap a category to add, hide, or reorder fields — turn off Author for Furniture, surface ISBN for Books, and so on.
Print Options
Print Options sets defaults for QR labels: paper size (1×2-5/8 or 2×4), vertical vs horizontal layout, font scale for the destination name and ID code, breadcrumb visibility, and a top margin for fine-tuning sheet alignment. These defaults apply to every label sheet you print until you change them, so spend a minute here once and skip the per-print fiddling later.
AI API Settings
AI API Settings is where you plug in your own API key for OpenAI, Anthropic, Google, or any of the other supported providers. Pick a provider, pick a model (gpt-4.1-nano is a great cheap default), paste your key, and toggle on Image Recognition to auto-fill items from photos and Sales Descriptions to draft listing copy. The links jump straight to the provider's key page and privacy policy.
AI Prompt Settings
AI Prompt Settings lets you tune the instructions the AI follows when it describes your items. Pick a preset (Concise, Detailed, Marketplace) or write your own — the example here keeps descriptions object-focused and avoids narration. The mic icon on the prompt field even lets you dictate the instructions. Hit Save prompt and every future AI description will follow your style.
Business Info
Business Info stores the store name, address, phone, email, Tax ID, and ZIP that print on receipts and PDF reports. Only Business Name and ZIP are required — the rest are optional but appear on customer-facing documents when filled in. The ZIP field is also what eBay and other marketplaces use for shipping calculations on your listings.
Square Payments
Square Payments is the bridge between the in-app cart and Square's card readers. Tap Connect to Square to OAuth into your Square account — once connected, the Card Reader and Manual Card options light up at checkout. The footer reminder is important: emailing receipts requires either an active subscription or a custom SMTP setup configured under Email Options.
Email Options
Email Options picks the mail server that sends customer receipts. The default Where The Bleep mail service sends from receipts@wherethebleep.app and requires an active trial or subscription. Custom SMTP lets you wire in your own server (Gmail, SendGrid, your business mail host) and bypass the subscription requirement entirely.
Salespeople
Salespeople manages the operator profiles that appear on the POS login screen. The empty state here is what you see before you've added anyone — once you tap Add Salesperson to create at least one operator, the app starts prompting for a profile and PIN every time you open it in sales mode. Each operator gets independent permissions and an audit trail.
Sync Progress
Sync Progress is the live status board for cloud sync. The Sync Controls panel shows the current state, last sync time, and a dropdown to change how often the app pushes/pulls. Below it, every data table reports its individual status — Up to date, Pulling, or a count of rows synced. If something gets stuck, this is the first place to look.
Connected Devices
Scroll down on Sync Progress and you'll see the Connected Devices card listing every phone, tablet, and desktop signed into your account, with a badge marking the current device. Tap the menu next to any other device to sign it out remotely. The footer shows your sync account and a Sign Out button that disconnects this device from the cloud while keeping your local data intact.
Cloud Sync Log
The Cloud Sync Log is the diagnostic record behind every sync. Each entry shows the operation, timestamp, and a brief status — pull/push counts, encrypted-row totals, conflict resolutions. Most of the time you'll never look at this, but when sync misbehaves, the log is what you'll send to support. The trash icon clears old entries.
Export Backup
Export backup creates an encrypted, password-protected snapshot of your entire database — items, locations, people, photos, the lot. Choose a strong password (you'll need it to restore), tap Export backup, and the app saves a single file you can stash in cloud storage, email to yourself, or move to another device. Without the password, no one can read it. Including you.
Restore Backup
Restore backup reads one of those exported files back into the app. Enter the password used at export time, pick the file, and the restore replaces all of your current data with the snapshot. Use this when migrating to a new phone, recovering from a wiped device, or rolling back a mistake. There's no merge — it's a full replacement.
Export My Data
Export My Data opens this format picker. CSV gives you a spreadsheet you can open in Excel or Google Sheets — handy for inventory audits or one-off reports. JSON Full Backup is a complete data dump for migration or deep analysis. PDF Report generates a formatted document suited for insurance claims. All three are unencrypted, so handle the files with care.
Connectivity
Connectivity runs live diagnostics on the services the app depends on — your internet connection, the Supabase backend, and the Sync Service — plus a snapshot of your subscription status. Tap Run All Checks to retest everything at once, or hit the per-row refresh icon to recheck a single endpoint. When something feels off, this screen tells you whether the problem is local or upstream.
Encryption & Security
Encryption & Security is the home base for end-to-end encryption. The green banner confirms your data is protected. View Recovery Phrase shows the 24-word backup that can recover your account if you forget your password — print it, save it offline, treat it like cash. The Danger Zone at the bottom links to permanent account deletion.
Two-Factor Authentication
Two-Factor Authentication adds a second login factor on top of your password. Tap Set Up Authenticator App to scan a QR code with Google Authenticator, Authy, 1Password, or any TOTP app — from then on you'll need a six-digit code from that app to sign in. Strongly recommended if you're syncing to the cloud.
Certificate Monitoring
Certificate Monitoring watches the TLS certificates on every API endpoint the app talks to (Supabase, OpenAI, etc). It records the issuer, expiry, fingerprint, and first/last seen dates, and flags any unexpected change — which is exactly what you'd see during a man-in-the-middle attack. Tap Run All Checks to refresh, or the per-endpoint refresh icon for a single one.
Change Password
Change Password rotates your encryption password. Enter the current one, choose a new one (12+ characters), confirm it, and optionally flip Sign out other devices on if you suspect your old password was compromised — that forces every other signed-in device to re-authenticate with the new one. Forgot the current password? The link at the bottom kicks off recovery via your 24-word phrase.
Sign Out
Tapping Sign Out in the Account section pops this confirmation. Signing out disconnects the device from cloud sync, but your local data stays put — items, locations, photos, all of it. You can sign back in any time with the same email and password to resume syncing. This is not a destructive action; it's just a pause.
Delete Account
Delete Account is the nuclear option — it permanently destroys every item, photo, sync record, and encryption key tied to your account. The screen walks you through verification step-by-step starting with your encryption password. The teal tip at the bottom is your safety net: if you have a local backup file saved, you can restore from it after deletion. Otherwise, this is irreversible.
Upgrade to Pro
Upgrade to Pro is the subscription pitch — Cloud Sync, End-to-End Encryption, Multi-Device Access, and Automatic Cloud Backup are the four headline features. The countdown banner at the top shows how many trial days are left. The full plan grid (5/10/20 device tiers, monthly and annual pricing) lives further down on this same screen.
Support
Support gives you two ways to reach the team: tap the contact card to launch your mail app pre-addressed to support@wherethebleep.app, or fill out the in-app form with name, subject (General Question, Bug Report, Feature Request, etc.), and message. Your account email is pre-filled. Both routes land in the same inbox, so use whichever feels easier.
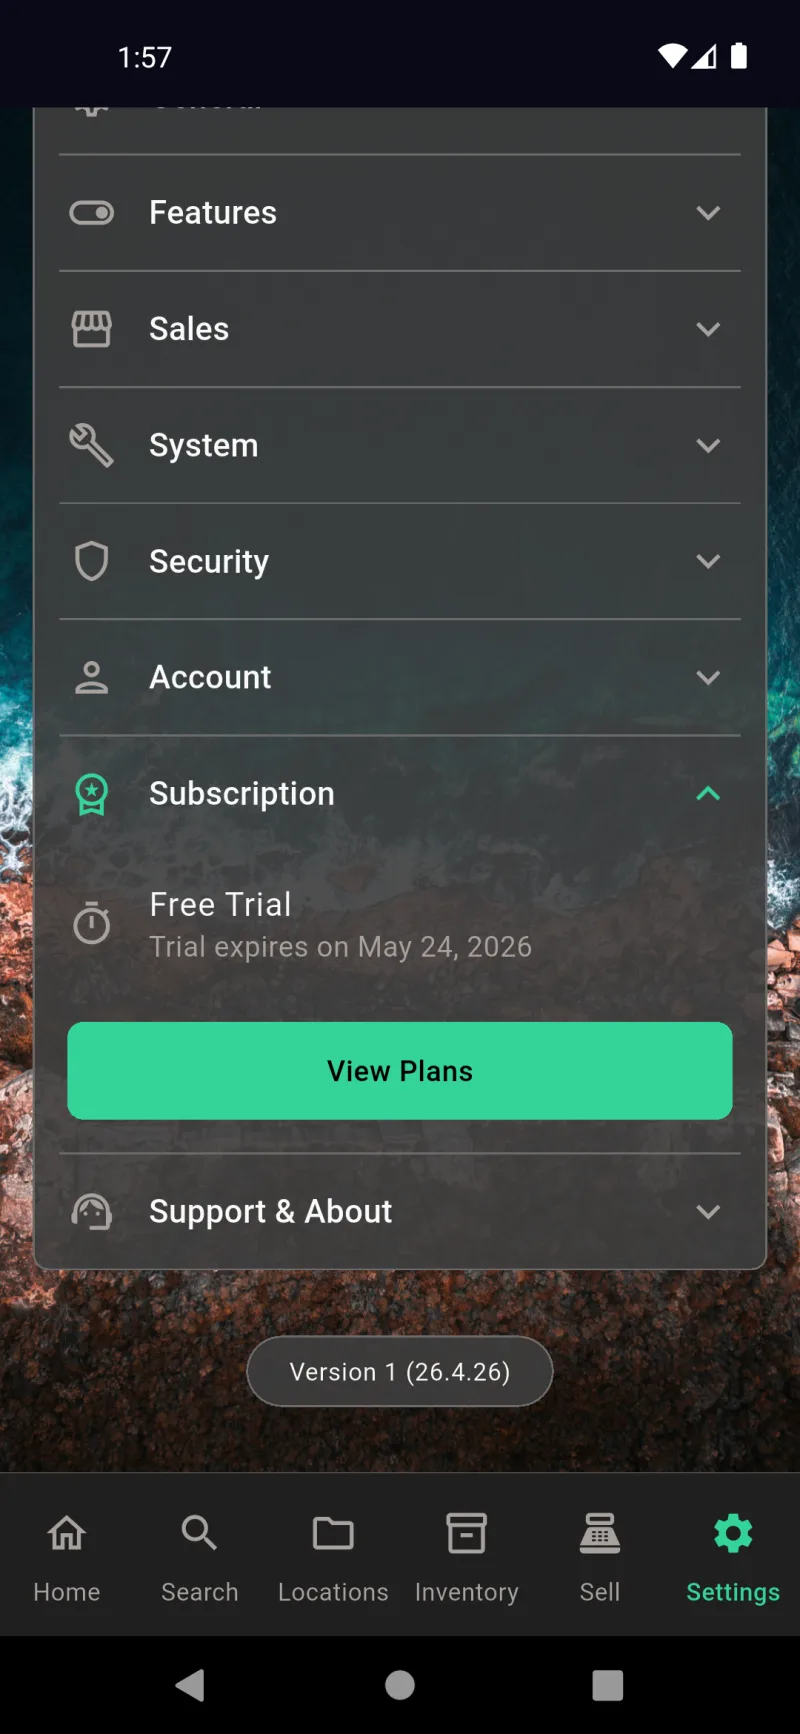
Subscriptions
Subscription Status
Open Settings → Subscription to see where you stand. New installs start with a 30-day free trial of all sync features — the panel shows the exact expiry date so there are no surprises. Tap View Plans to open the upgrade screen any time, whether you're still in trial, already subscribed, or your subscription has lapsed. Everything else in the app works without a subscription; the paid plan only unlocks the Cloud Sync features.
Pro Benefits
Upgrade to Pro opens with a Cloud Sync hero and your trial countdown banner — "28 days left in your free trial. Subscribe to keep syncing." Below that, four benefits explain exactly what you get: Cloud Sync across devices, End-to-End Encryption before your data leaves the phone, Multi-Device Access from phone, tablet, or desktop, and Automatic Cloud Backup. The pitch is honest — these are sync-only features, not a feature paywall on the rest of the app.
Same Pitch, Any Device
On any device past the trial window, the same upgrade screen loads without the countdown banner — just the Cloud Sync hero and the four benefits. Since plans are tied to your account (not the device), buying on one phone unlocks sync on every paired device. Scroll down to see the device-tier pricing.
Pick Your Plan
Three tiers, picked by how many devices you need to keep in sync. 5 Devices at $39.99/year ($3.33/mo) is flagged Best Value and pre-selected — there's also a $3.99 monthly option in the same tier. 10 Devices at $74.99/year and 20 Devices at $149.99/year cover larger households or small businesses. Annual plans show the equivalent monthly price so you can compare against the monthly option without doing the math.
Continue, Restore, Manage
Continue hands you off to your platform's payment sheet — Apple or Google handles the charge, and your subscription is tied to that store account. Restore Purchases brings back an existing subscription on a new device or reinstall. The fine print spells out auto-renewal (cancel at least 24 hours before the period ends) and links straight to your device settings for managing or cancelling. Privacy Policy, Terms of Service, and EULA links round out the screen.